Sweating Oil at Filter Cover

robindean

XS400 Addict
Messages
409
Reaction score
0
Points
16
Location
Chicago, IL
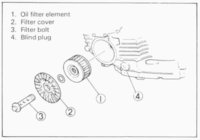
The cover to my oil filter is bleeding a little bit. I'm not too concerned. My oil level remains strong for the duration.

However, I'd like to remedy the matter. I'm using FRAM filters. Perhaps their O-rings aren't up to snuff? Or, maybe the edge of the cover is marred?

Either way, I'm wondering if there's a spray on coating that can make O-rings behave better.

I'd also like to know if there's a sort of psuedo-sealer that I can line the filter cover with to keep the seal tight.

Help me out here, folks :D
 
Is there any chance you could have over-torqued the bolt on the filter cover the last time you changed the oil - like I DID?
It wasn't hard to do. It only calls for 11 ft.lbs. and I missed the tiny signal from the torque wrench and went past 11 lbs.
Next time you change the oil, inspect the cover for tiny cracks like in my pics.
If the oil is coming from around the centre bolt, and if there are no little cracks from over-torquing, I would get an O ring one size larger for the shaft that the filter mounts on.
My cover had to be welded right into the centre hole to stop the slow drip. The machinist then had to buff the hole smooth. He was good but the job wasn't perfect as the weld had slight imperfections. He advised getting a slightly bigger O ring (high temp, not just a plumber's O ring).
I did get one and it works perfect - narry a drip now.
If you needed to tighten it up asap - i.e., before being able to find and buy one, you could slide the current O ring out of the slot, wrap the slot a few times with teflon tape to fatten the shaft, then slide the O ring back into the slot.

On the other hand, if the seepage is around the perimeter of the cover, you could try a new giant O ring there. The book calls for a new one every time but all the mechanics I've talked to use the old ones over and over.

Whatever you do, DON'T over-tighten the cover!
 
On over-tightening / shattering the cover ... been there done that (last winter). This cover is a replacement and I ALWAYS go to the recommended torque value.

Me thinks it might be a combination of things.

1) For starters, I've been reusing the same crush-washer (exterior washer just under the bolt on top of the cover). I'm thinking I'll replace that.

2) I'm considering the (moderate) use of liquid gasket around the rim. My only concern is whether I'll be able to REMOVE it. Anyone else have a similar method that is relatively fail safe?

As things are, I'm going to smather it with baby powder to really nail down the location of the leak.

More soon.
 
you could use liquid gasket, the really pliable when dry ( bendable) and let it completely dry before assembly. it would be like a big o-ring. You could put a fiber washer under the crush washer on the outside as well that may be all you need
 
1) For starters, I've been reusing the same crush-washer (exterior washer just under the bolt on top of the cover). I'm thinking I'll replace that.
I don't know what you mean by a crush washer. Mine had no such thing and the diagram in the book shows none (see attached). According to it, there is the cover, the bolt and the small O-ring on the bolt which seals against the inside surface of the bolt hole on the cover. The steel flange under the bolt head goes tight against the flat aluminum surface around the bolt hole on the cover. No crush washer.
If you are using one, maybe it is seeping. I did use some high temp silicone to fill that space on the advice of the machinist/welder who repaired my cover because he feared maybe the small O ring would not be fat enough to seal against his slightly imperfect hole repair.
2) I'm considering the (moderate) use of liquid gasket around the rim. My only concern is whether I'll be able to REMOVE it. Anyone else have a similar method that is relatively fail safe?
Do you not have a gigantic (~3.5" diam) thick rubber O-ring to fit into the channel on the inside of the cover near the rim? This is the O-ring which Yamaha says to replace with each filter change. I would try a new one of those first - before I tried anything that might not release later.
 

Attachments

  • Oil Filter Assembly, dohc.JPG
    Oil Filter Assembly, dohc.JPG
    19.2 KB · Views: 404
  • Permatex Ultra Copper Hi-temp RTV Gasket.JPG
    Permatex Ultra Copper Hi-temp RTV Gasket.JPG
    58.2 KB · Views: 311
@Lou ... this is good, I think our terms are about to become aligned right now:

1) By crush washer, I meant the metal flange. Mine became slightly misaligned, warped/bent somehow. I discovered this during my last oil change and opted to flip it over, allowing the bolt to press it into place as I torqued everything back up to spec. It's now flat - BUT - seeing as how I thought this was a crush washer, I thought maybe I'd replace it next time. You've steered me different, although ... wouldn't it be easy to replace this flange? Also, would a little bit of high-temp silicon help?

2) I have a "gigantic O-ring" in the box with every filter and I replace them EVERY time (using FRAM filters). However, I'm suspicious as to how well they're working, being as how the engine is 30+ years old. My concern is that maybe there are some (minor) chips and scratchs around the base of the engine or the top of the cover. That's where I'm getting my idea to put some easily disposed, soft, high-temp material to ADD to the seal. I'm not sure that will work or if it's even smart, so I'm reaching for advice about it as a prospect.

Any thoughts about all of this?
 
1) By crush washer, I meant the metal flange. Mine became slightly misaligned, warped/bent somehow. I discovered this during my last oil change and opted to flip it over .... wouldn't it be easy to replace this flange? Also, would a little bit of high-temp silicon help?
One of us must have an aftermarket hollow bolt or something. You seem to have a separate flange which you can flip. I have exactly what is shown in the drawing (attached above). The bolt flange is part of the bolt and its flat steel surface goes flush against the flat aluminum surface around the hole in the cover. The welder suggested that I use the high-temp orange silicone in case a touch of oil seeped past the small O ring on the bolt. If your seepage is around the bolt hole, try that and see if it works. I put the bead down around the hole and then spring-clamped the flange down onto it and let it sit overnight.
Next day, I installed & tightened it (11 lbs) and either the O ring works perfect and the orange gasket is redundant, or the 2 in combination do the trick. Either way, no seeping.

2) I have a "gigantic O-ring" in the box with every filter and I replace them EVERY time (using FRAM filters) .... Any thoughts about all of this?
My only thought regarding this is that maybe FRAM doesn't provide as thick an O ring as the original Yamaha spec. I re-used the old O ring and there's no leak there either. Maybe it's not seeping around the outer edge at all.
Do the baby powder trick first.
 
Maybe that part is nothing. Maybe it's very existence in the scheme is causing my trouble.
That could be, I haven't found a manual or a schematic that has a separate piece pictured. I would try experimenting with the baby powder and a thicker small O-ring for the shaft. If the latter is good and snug against the inside of the cover hole, it shouldn't leak.
 
The baby powder calls it: All leaks are coming from my oil filter cover.

It's leaking from the rim and the center bolt. That non-existent part ("crush washer" as I called it) might be causing a separation that is compromising the larger O-ring at the rim.
At the same time, I'll probably try and get thicker O-rings in the future. Either way, problem solved!

Side note: after flinging that baby powder under the engine, some of the dust got into something. She started up on only one cylinder ... but the other one eventually found it's way back into action. All's well.
 
...That non-existent part ("crush washer" as I called it) might be causing a separation that is compromising the larger O-ring at the rim...
Of course. Diagnose first before taking things apart that may not go back together in the hands of a Luddite (at least that's my own personal credo for keeping the bike running :wink2:).

...after flinging that baby powder under the engine...
Next time, do what the Lone Ranger would do. Throw your lasso over a low-hanging branch and haul that front wheel straight up. Makes baby powder application much easier ... :p
 
The baby powder calls it: That non-existent part ("crush washer" as I called it) might be causing a separation...
Maybe not so non-existent after all. I found this this drawing which (maybe?) conflicts with the one above from the repair manual:
Not only am I missing the "washer, plate", but I have never seen either of the 2 grommets. Do you have grommets in addition to your "crusher"?
 
If you're talking about #3 ... those are usually already attached to the oil filter when you buy them. They often come with #6 in the box as well.

#7 is a sinister little question mark. I'm not sure if I have or haven't dealt with it.

Actually, I think it might be what I thought was a crush washer! It actually goes inside of the cover (maybe). Doh!
 
... #7 is a sinister little question mark. I'm not sure if I have or haven't dealt with it...
If "washer, plate" simply means a closed flat washer (as opposed to a lock washer), then it might simply fit inside those 3 little raised bits on the bottom of the cover. If so, it wouldn't affect the spacing, just the flow.
But if it sits on top of them, then it would affect where the filter sits on the hollow tube. Would your "crush washer" do the 1st or the 2nd thing?
 
I opted to change the oil for my upcoming (long) trip.

The washer does rest on TOP of the oil cover's prongs inside the engine (below the oil filter). Being as how it's very thin and the oil filter is padded with medium strength rubber, I don't think it effects pressure on the oil filter very much.

After doing this, I also used a dry sanding sponge to gently remove grit from the base of the engine around where the cover seals. I also cleaned the removable parts with a rag and some degreaser.

My oil leak has completely disappeared :D
 
My oil leak has completely disappeared :D
Nice to know you won't be leaving any dribbles in Dolly's parking lot. :thumbsup:

Did you ever figure out if you were missing a strainer part behind that flat plate beside the oil filter cover - or is that simply a part Yamaha made to cover an opening in the casting so they could save money on the casting?

My manual for the DOHC says nothing about a strainer or about ever removing one as part of the oil change routine - just the drain plug and the filter cover and the filter element itself (which should be the thing trapping any particles anyway - non?). :shrug:
 
Well, the strainer is a different part altogether. It's more of a trap than a strainer.

What I thought was an external washer was exactly that questionable part that went on the interior in between the cover and the filter.

That's what I mentioned in my previous post. It's very, very thin. By my estimation, if it even IS a necessary part, it's only funciton is to redirect heavy oil flow away from the cover's bolt so as not to leak(???).

My point: The diagram you found is the very same construct I used this time and that sealed the leak. The "crush washer" that I had on the outside is now on the INSIDE and rests above those "teeth" that are on the inside of the cover itself.
 
Well, the strainer is a different part altogether. It's more of a trap than a strainer ...
Excuse my thickness, must come with age, but I thought that you took the flat plate off (the one with the 6 or 8 bolts) and all that was underneath it was a gasket and an empty cavity in the casting. Was there a filter screen in there?
Based on my manual's lack of any mention of any kind of oil strainer, I figured that Yamaha had simply stopped bothering with a strainer and simply closed the cavity with a steel plate (unlike with the sohc, where cleaning the screen is prominently featured in the manual).
 
No problem.

For the XS400R Seca, there are two oil related chambers under the engine. One belongs to the oil filter (the round cylinder) and, as far as my thinking is concerned, the other is the "oil strainer".

I may be wrong. Perhaps both terms refer to the same concept - BUT - nonetheless there are two chambers.

I've taken the ROUND one off many times (oil filter) and that was the source of my leak which has since been remedied by correcting the order in which that little washer is installed (under the cover, not over it).

What I've been calling the oil STRAINER is the slightly more rectangular cover. Inside, there's nothing. It's not reeeeeally a strainer so much as a "trap" for any chunks the might be heavy enough to reside in it.

I checked it (clean) and replaced it with my very first gasket, which is holding strong.

That help (you geezer)? ;)
 
Back
Top