Kutay

XS400 Member
Messages
20
Reaction score
12
Points
3
Location
Netherlands
I think I will post how the build of my bike is going here. so i cant rack down any info in the future and hopefully some things are helpful for some people.
so far:
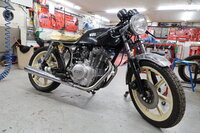
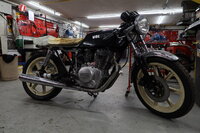
I bought a working xs400 in shambles. The frame was brown, the rear was chopped off, no seat, sketchy wiring, no blinkers. The bike had to be rebuilt. Being a student and having a small room i thought this was a great idea.
Here is the bike when i first bough it with ziptied janky seat on it
IMG_20201221_013635.jpg

I had to learn to weld, because why not.
First i stripped everything down and put all the screws into a single bag like a genius. That made me loose track of every single on of them and treat every threaded hole as just a hole with no corresponding screw in the future.
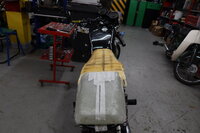
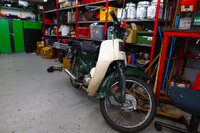
Here is the bike striped down with sketchy welds behind my room.
IMG-20210412-WA0005.jpeg
Some of ym bad welds for the hoop as well. I was getting hopeless with the welding. I used fluxcore welding and there wasnt much info online about parameters and the hoop I ordered didnt have the right dimensions. I didnt want to wait anymore. So i just went for it. Being flux core you cannot do multiple passes and i burnt through much of the thin material.
Here is the bad weld for the hoop, my thinking was, i wont sit on this part of the bike so it can be bad.IMG-20210307-WA0007.jpeg
then I focused on studying and not failing university courses. Meant 4 years of nothing on the bike. Just wheels, fork, tank, engine was installed. This year I had some time and money so i started on it again. Previously I had made a electronics tray and ziptied it on, someone stole it and my foot pegs. I had to get it done again, it was expensive and lots off effort to find a private laser cutter to get the tray cut for me so i could bend and weld it. It is done now, and the tray fits in beautifully. Also started my motorbike license, small detail. Joining the uni workshop was a blessing. They have all the tools and i dont need to move my bed and wardrobe to work on the bike each time.

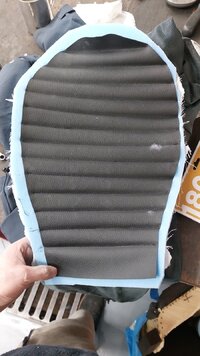
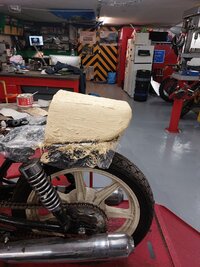
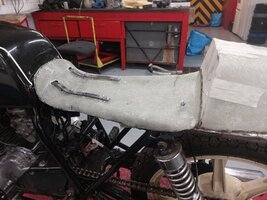
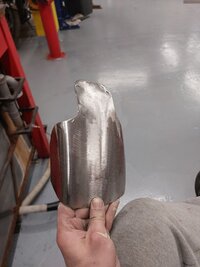
First i wanted to start by making a seat pan. Seeing people do it online it seemed simple enough. It was, but you need to think about whats going to happen in the following 5 steps. I didnt. I spent 6 hours one night and layered a seat a cowl in one go. The mistakes i made were
- Making the cowl and the seat in one piece
- Not ensuring a flat surface on the seat
This meant i couldn't have a plate to wrap the leather around and glue foam onto. Because the cowl was connected tot eh seat i couldn't just wrap around leather over the whole thing. I cut it but then i also realized the gap i left for electronics was too big. Rather than spending couple days dreadfully bodging it together, i am going to redo the seat, this time with a plan :D.

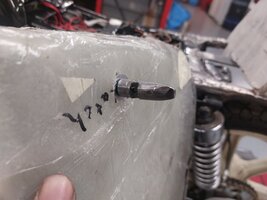
There is a long list of things to do step by step right now. What i learnt so far is, have a plan. Dont just do it and figure it out on the way. And what i haven't learnt yet is where to find a shifter since my broke.

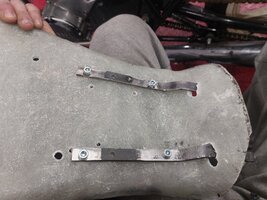
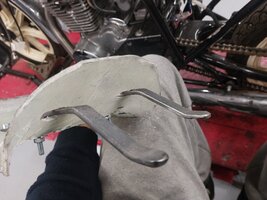
Next i will be making a pin and arms and alignment pins for the seat pan i will make and also a foam mold for the seat cowl.
 
Yesterday was another 6 hour workshop session. I cut the rear hoop, I realized it had to be longer and I didnt trust the welds. Turns out my welds were solid and I forgot even that I had placed solid pieces inside the tube. The hoop is now 13 cm further back, the welds are better and it was really difficult to weld due to material thickness difference, it is done. I want to add a brace still to make it a little bit more stiff and give it rigidity. I can lift the bike just by holding the hoop, so I'd like to assume its strong enough. It wont carry my weight, that is already relieving. The welder ran out of CO2, that needs to wait. In the mean time I'll be making the pins so the seat can align with the frame and not pivot at the top and bottom connection points. Also arms for the seat to 'hold' the frame below the tank and a pin for it to click into the lock at the back. Today I should get bunch of materials I ordered online, fiberglass, epoxy, handlebars etc. I got some foam yesterday, which was really expensive for no reason. Tonight ill be focusing on making a cowl mold, then maybe cutting the fiberglass sheets to length. Tomorrow I'd like to lay the fiberglass over the cowl already. The day after that cut the cowl to shape, the day after that make the seat. I am in winter holiday right now, before it ends, I want to finish the seat pan and the cowl.
 
The fiberglass cowl is done. I spent 4 days in total. 2 days for foam shaping 1 day for fiberglass 1 day for taking it out and welding a structure to the frame. I will upload some pictures. This time it turned out tge way i wanted it to. I will fill some irregularities with body filler. Right now bike is ready fir another fiberglass session, the seat pan. In the meantime I decided to do a RS125 fork swap. Lets see how that turns out. Havent ordered the forks yet but the just the yoke. I thought with the RS125 yoke i have more fork options. RS125 is definetly a good options tho. I am just searching atm.
 
I got rubber parts to connect the carbs to the air filters. They haven't arrived yet but the rubber advertised had the correct inner diameter. I had problems putting on the stock rubber. Here is teh link for EU in case anyone else has the same problem with the air filter carburetor connector rubber https://vrachtwagens.autodoc.nl/lema/14348376
 
The seat is dry and I shaped it. I did a bad job on the tank side. But i will ignore it and let tge foam cover it. I have been shaping foam from the original bike. Its been really vauge because it is flexible. Here are some pictures from the process.
 
The seat is dry and I shaped it. I did a bad job on the tank side. But i will ignore it and let tge foam cover it. I have been shaping foam from the original bike. Its been really vauge because it is flexible. Here are some pictures from the process.
can't see any pictures Kutay
 
Ooh the legend drewpy. Aaaah you are right hahaha.
The foam mold for the cowl20231230_163059.jpg 20231230_172911.jpg

The bike under fiberglass, the seat pan is drying
20240103_230029.jpg

Fixing the cracked light housing quickly with leftover fiberglass20240103_230045.jpg
New extended back without the supports welded. This was somewhat difficult. The bavk was cut too short, so I welded a solid cylinder with very high Amps. Then welded a tube over it and connected them to the hoop. Screenshot_20231228_094358_Video Player.jpg
 
The foam is cut to shape. 20240109_122021.jpg

The leather work needs to be done now. I have exams so the bike will be left to utself for about 1 month.

I did the thing, got RS125 forks :D. They arrived yesterday and are really impressive, especially after the 30mm forks we have on the XS400. I bought and axle hopefully it fits, otgereise i will just machine my own. Handlebars are stuck in tge upper triple, those need to be drilled out. Afterwards i will machine my own handlebars too.
The picture will follow.

My questions are...
How can I measure, what can I measure to figure out what bearing I need to fit a RS125 2001 triple to the XS400?
The forks are leaking so I want to rebuild them. What should I look for. Any known dimensions? Advice from someone experienced would be great!
 
I got a bit inspired by the idea of somewhat better forks, so opted for an ebay vz800 triple-tree and forks. Apparently they will fit well- will have a try at adapting that to the bike in the spring. Apparently the axle is the same diameter, so will need some spacers machined and some kind of brake adaptation.
 
Tried the forks yesterday. I didnt change anything they seemed to fit. How can I make aure the bearings contact all along their contact surface?
The triple feels smooth and has no move when i assemble it. I assume it fits. Ill machine spacers for the front wheel. And I dont know how to work around the tachometer. Anyone any advice?
Ordered new bearings to fit the larger RS axle.

I also realised a little late. Is the frame too close to the back wheel. Will it hit when the suspension is compressed?

My questions:
How can I deal with the speedometer?
How can I make sure the triple crown fits and it doesnt only contact partially?
Rear wheel rub and solutions?

20240114_115145.jpg

20240114_115140.jpg
20240114_115133.jpg
 
I got a bit inspired by the idea of somewhat better forks, so opted for an ebay vz800 triple-tree and forks. Apparently they will fit well- will have a try at adapting that to the bike in the spring. Apparently the axle is the same diameter, so will need some spacers machined and some kind of brake adaptation.
Update us om how it goes gpounce32768
 
Also ordered a brake disc and a calliper. I will be looking for a 12mm master cylinder I think. First I want to try with 11mm one we have on the XS. The ratio between 12mm master and 4 piston rs125 calliper is 25.00 i think. That is in the sweet range of 27-23.
I am expecting the delivery of:
Callipers
Disc
Wheel bearings
Indicators
Brake light
Fork seals
Fork dust covers

I will update the sizes once they fit. I still need headlight brackes, which has been a struggle. I dont want the sheet metal AliExpress one thats everywhere. But i dont know where to fit 50mm brackets. Still need mirrors, ignition switch, master cylinder, glue for foam. Then i have everything to assemble the bike :D
 
Finally got some pictures from my camera. One with the old forks. I will change the colour of the bike to red,white,black, but for now it looks like the following.
 

Attachments

  • IMG_8166.JPG
    IMG_8166.JPG
    248.4 KB · Views: 51
  • IMG_8169.JPG
    IMG_8169.JPG
    202.8 KB · Views: 48
The fiberglass cowl i made is a good shape i think, but it doesnt cover the black hoop, or the frame. I assume it will not be so obvious once it is painted, now it is bare metal so it shines. Any opinions on that, i was thinking maybe i should make yet another cowl to cover the sides. Or jsut wait untill the seat is finished. Added a cheeky Honda cub 50 pic as well. Quick side project.
 

Attachments

  • IMG_8171.JPG
    IMG_8171.JPG
    132.6 KB · Views: 42
  • IMG_8176_1.JPG
    IMG_8176_1.JPG
    184.8 KB · Views: 41
Lol, from the thumbnail of the cub, my brain short circuited for a second thinking you put a cub knee fairing on the XS! I've only had a few sips of coffee so far, so I'm not fully awake either!
 
Heloooo. After a long time of exams and paper work i continue with the bike.
FInushed the seat latch mechanism. Now doing a bondo over the cowl and shaping it. I also got a course to use a industrial sewing machine, so i can sew the leather apholstery of the seat. if it fails i will send it to someone who knows what they are doing. I am aiming to finish it. Push push with the progress. I bought the bike 5 years ago, and since winter this year i restarted from stracht with better tools and workspace. I also got my licence yesterday :D . Forgit to say. Also made a mini mudgurard for the back. I am a bit worried about the rear wheel hitting the frame tho. Im unsure. If the suspension bottoms out the wheel touches the metal.
 

Attachments

  • IMG-20240422-WA0000.jpeg
    IMG-20240422-WA0000.jpeg
    313.5 KB · Views: 9
  • 20240421_235526.jpg
    20240421_235526.jpg
    420.7 KB · Views: 8
  • 20240421_235530.jpg
    20240421_235530.jpg
    313.3 KB · Views: 8
  • 20240421_152315.jpg
    20240421_152315.jpg
    417.6 KB · Views: 9
  • 20240421_152312.jpg
    20240421_152312.jpg
    251.7 KB · Views: 8
  • 20240421_152308.jpg
    20240421_152308.jpg
    188.9 KB · Views: 9
  • 20240421_152254.jpg
    20240421_152254.jpg
    360.1 KB · Views: 8
  • 17137381861018290386377627200562.jpg
    17137381861018290386377627200562.jpg
    293.3 KB · Views: 8
Lol, from the thumbnail of the cub, my brain short circuited for a second thinking you put a cub knee fairing on the XS! I've only had a few sips of coffee so far, so I'm not fully awake either!
Today i went for a motogymkhana with the Cub it was funny scraping the leg shield on the turns :D
 
I also got a course to use a industrial sewing machine, so i can sew the leather apholstery of the seat. if it fails i will send it to someone who knows what they are doing.
Bravo! I guarantee that every attempt after this will be better, but you will never get good unless you start in the first place and a failure is still the way you will learn. The bike is starting to take shape!
 
Back
Top