I've used this technique for some bracketry. be carefull it gives off some very nasty gas
-
Enjoy XS400.com? Consider making a donation to help support the site.
XS400.com receives a small share of sales from some links on this page, but direct donations have a much greater impact on keeping this site going.
You are using an out of date browser. It may not display this or other websites correctly.
You should upgrade or use an alternative browser.
You should upgrade or use an alternative browser.
Tank rust cleaning
- Thread starter chris
- Start date
lhaolpa
XS400 Junkie
I've got thousands of acres of rolling Tennessee hills to soak up that nasty odor,so it wouldn't bother me in the least,besides,the moonshiners stink it up pretty well themselves. lha
http://www.xs650.com/forum/showthread.php?t=30
http://www.altelco.net/~jacil/clay/motorcycle/KElecSetup.html
http://www.stovebolt.com/techtips/rust/electrolytic_derusting.htm
http://antique-engines.com/electrol.asp
Trying this out and after aprox. 26 hr result gotta say very pleased and quite simple!
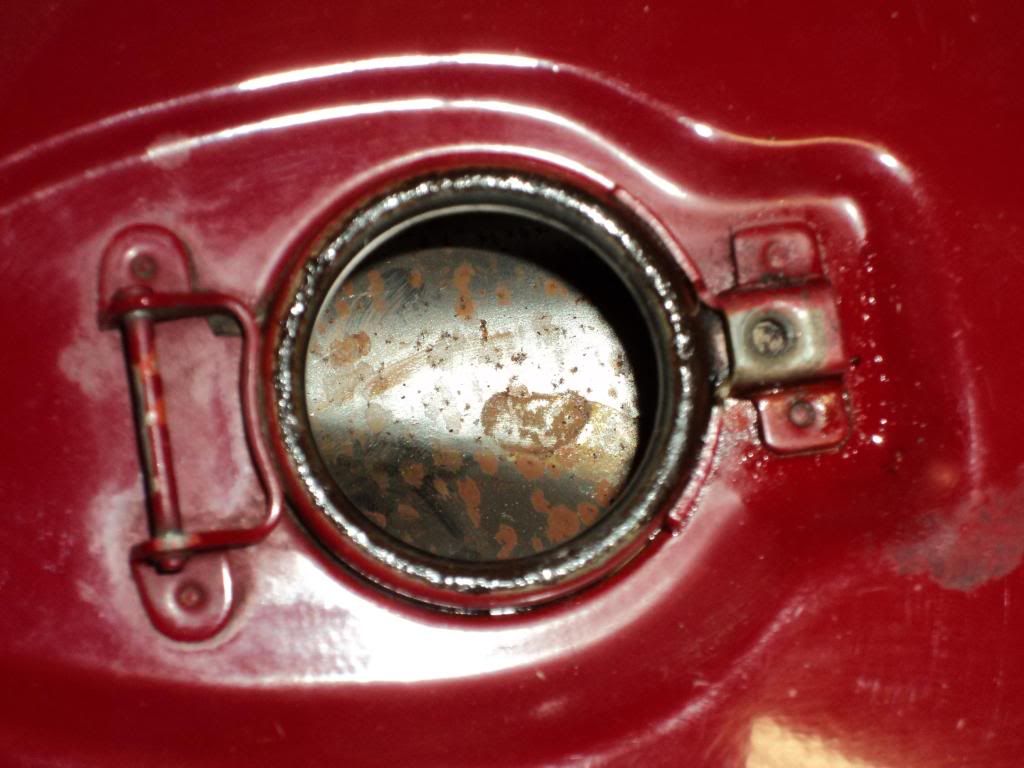
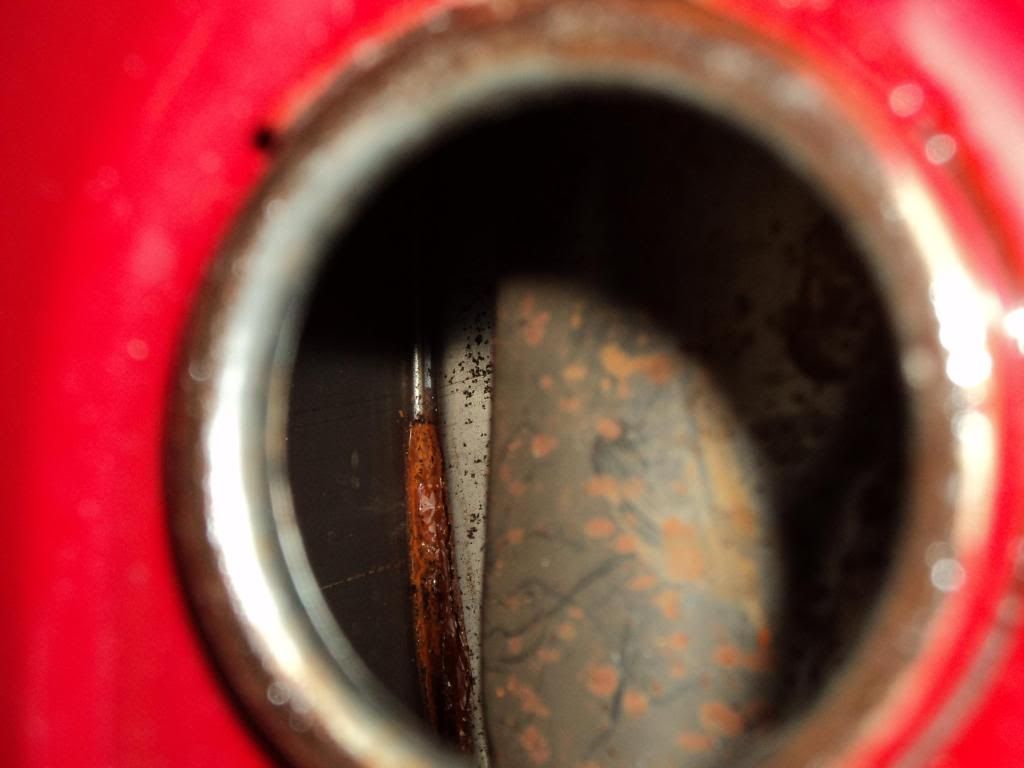
Couple before pics, could be worse. The one chunk of rust I could have scraped some but wanted to see the effectiveness of the process.
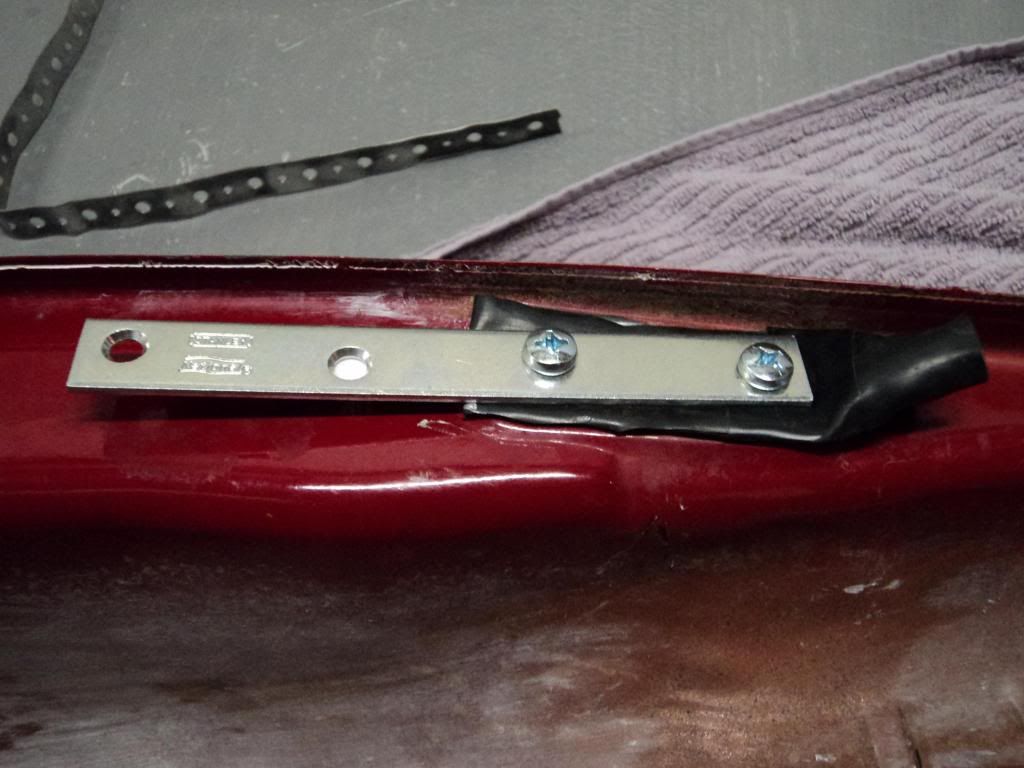
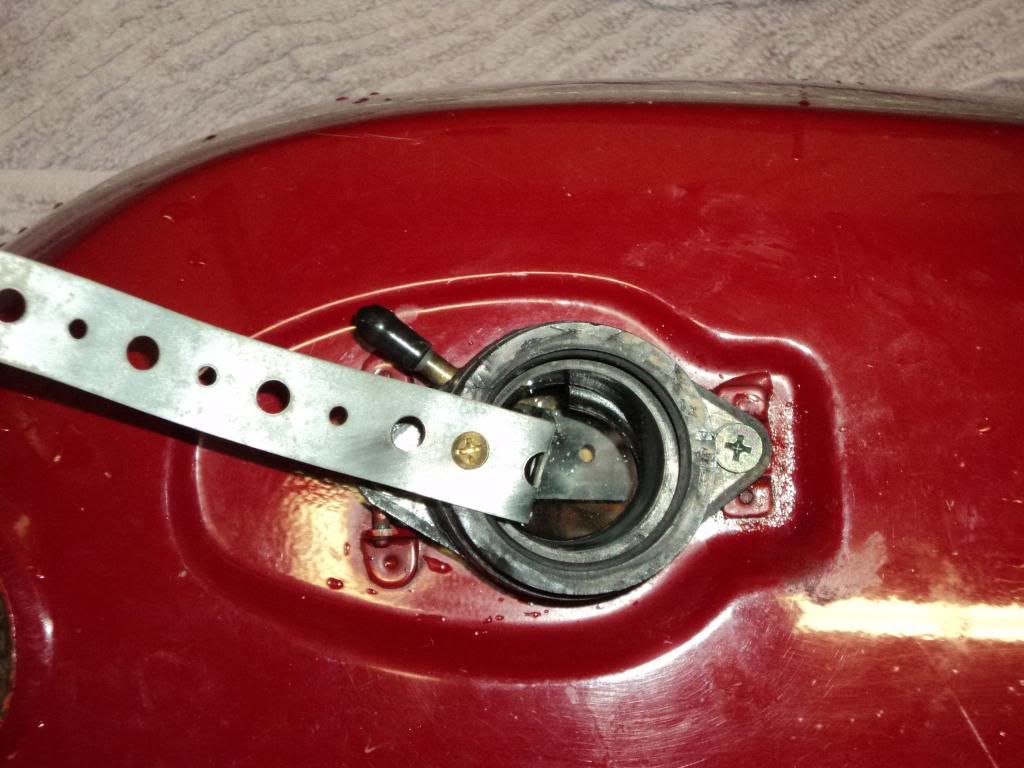
Rinsed tank out of course, found this metal strap just digging around first thing I found and figured if a coat hanger worked. . ok, so i didn't go quite that far back in the tank.
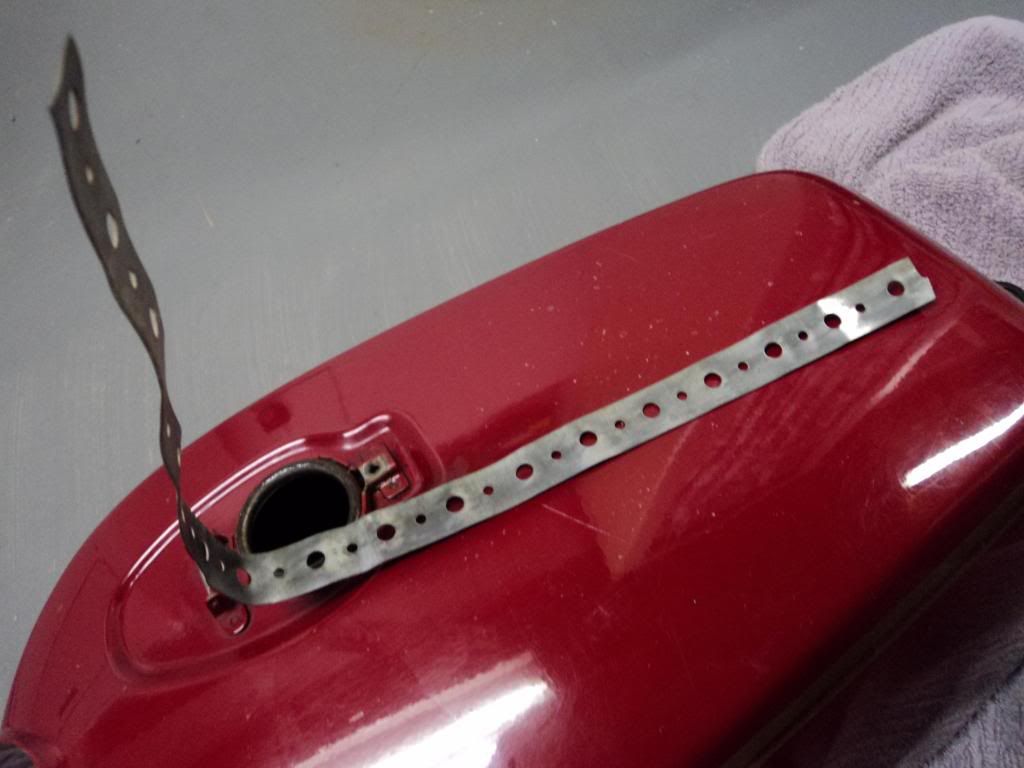
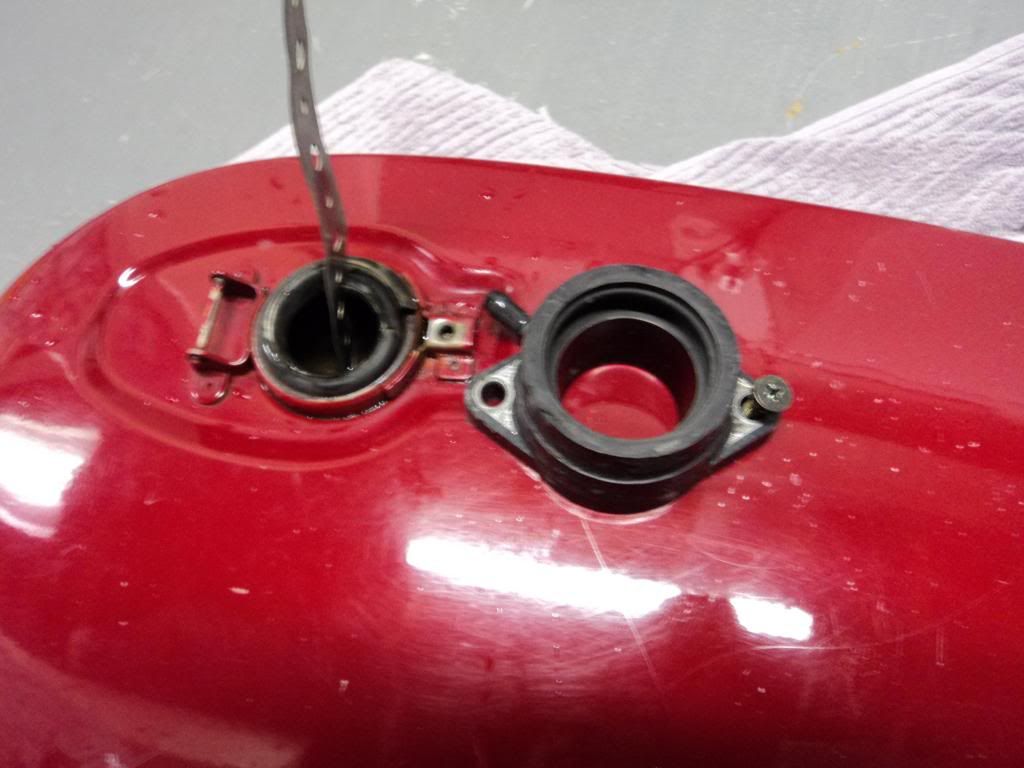
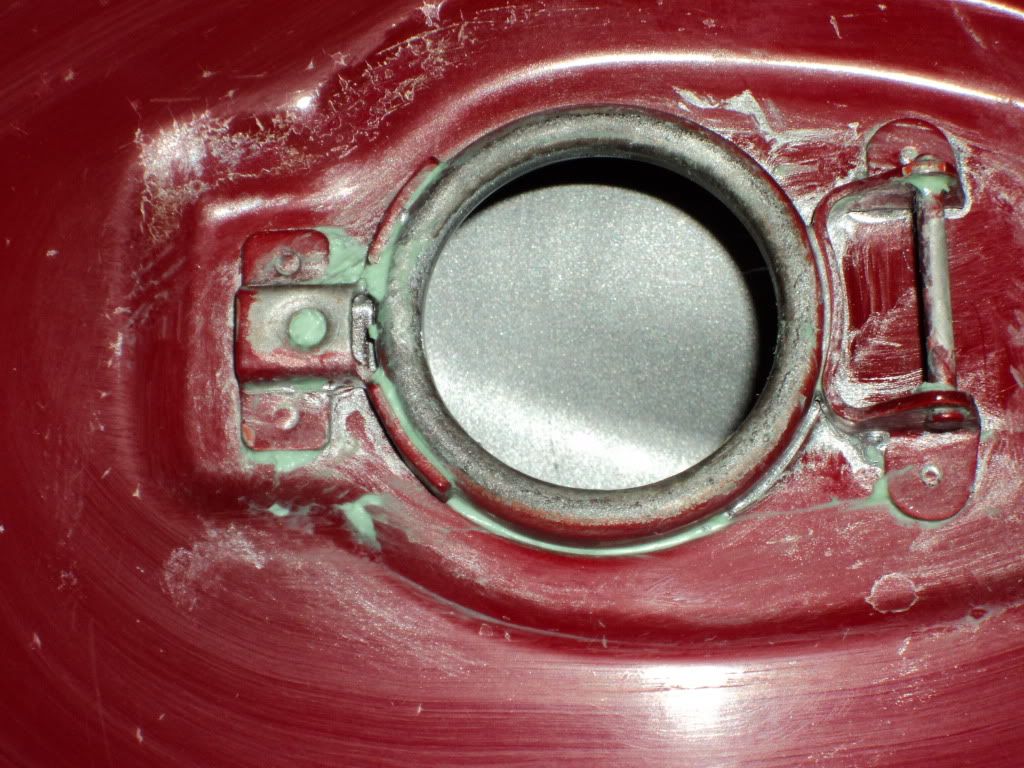
$1.99 bracket and the piece of HARD rubber (not best) but again, first thing I found, looked like from wiring harness sheathing, but it sealed up petcock opening so all good.
Water in, checked for leaking.

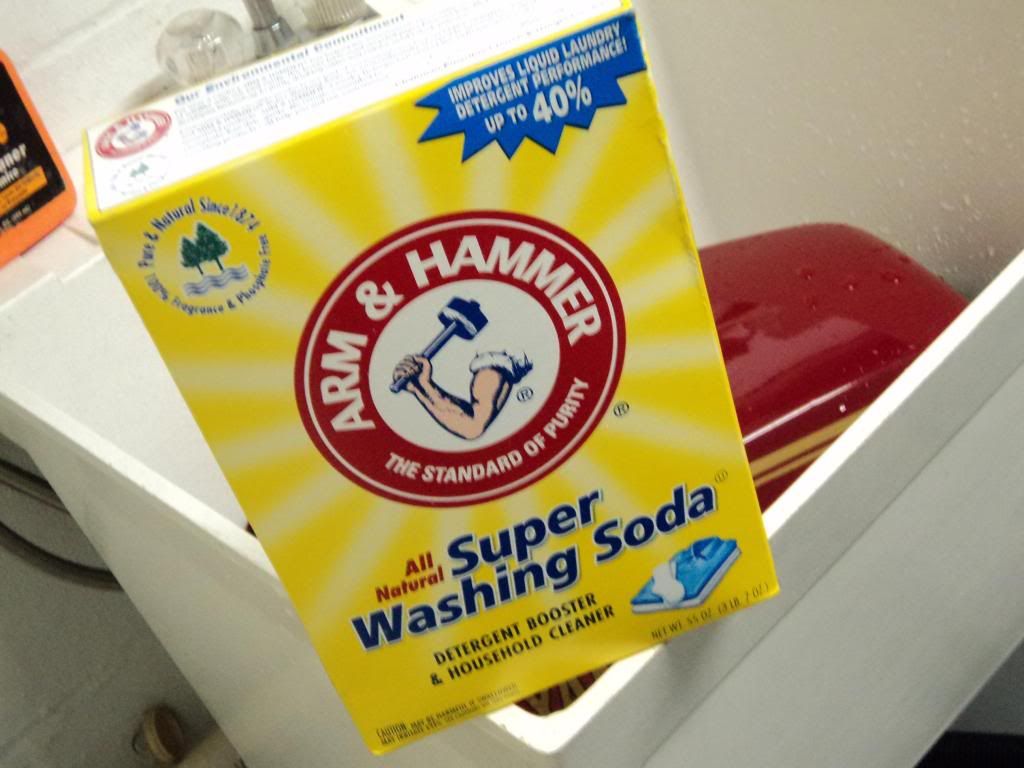
The good stuff, $4 at grocery store laundry aisle.
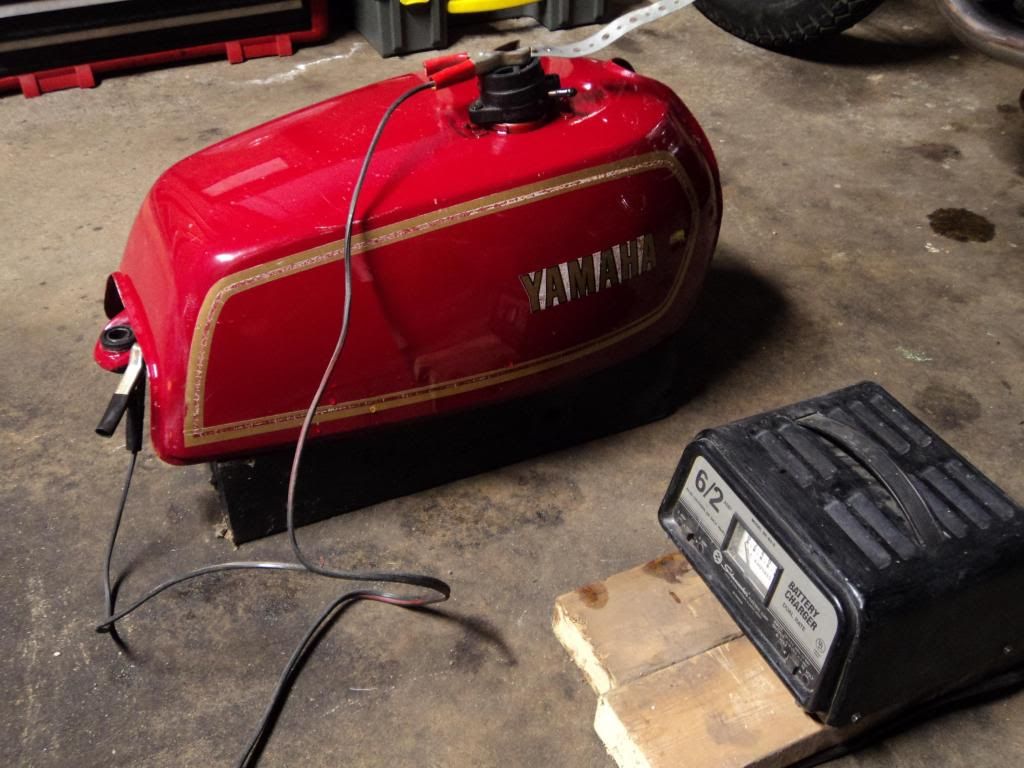
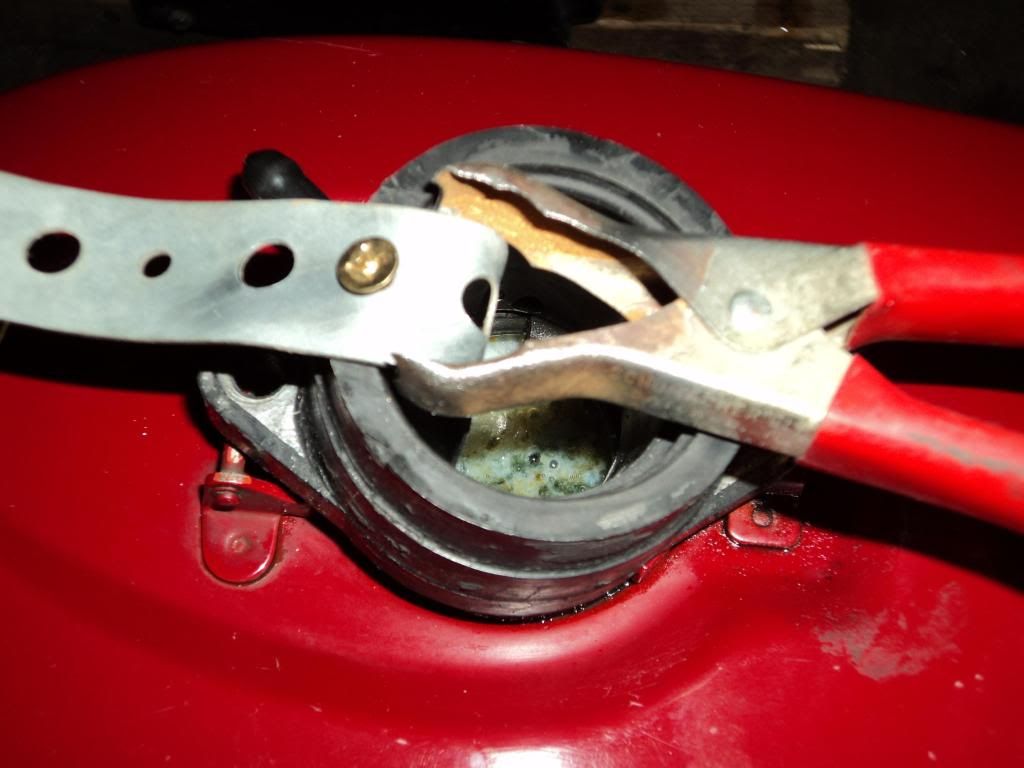
Metal strapping bent and in. Used old carb intake boot screwed to filler cap and bent then screwed down strap to the boot. Hey, , ,it was the first thing I found, HA.
Looked like i was in a hurry, but made absolute certain not touching inside of tank.
Out to the garage, the usual setup.
After merely 10 min. started seeing stuff. This was after about 20 minutes.
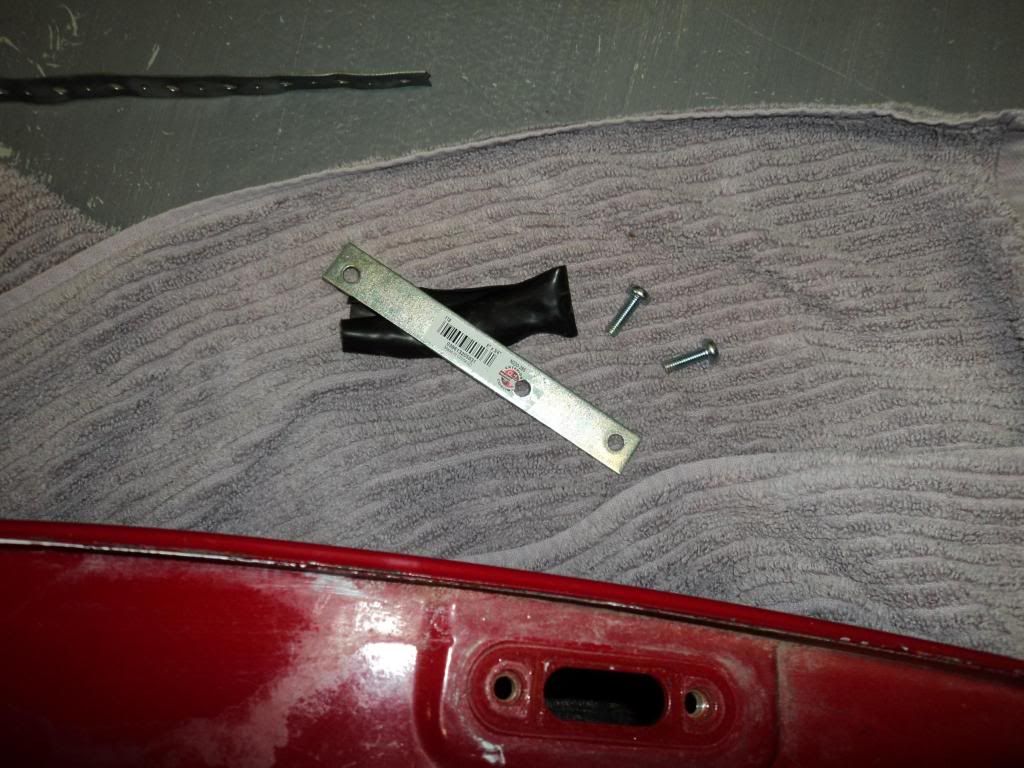
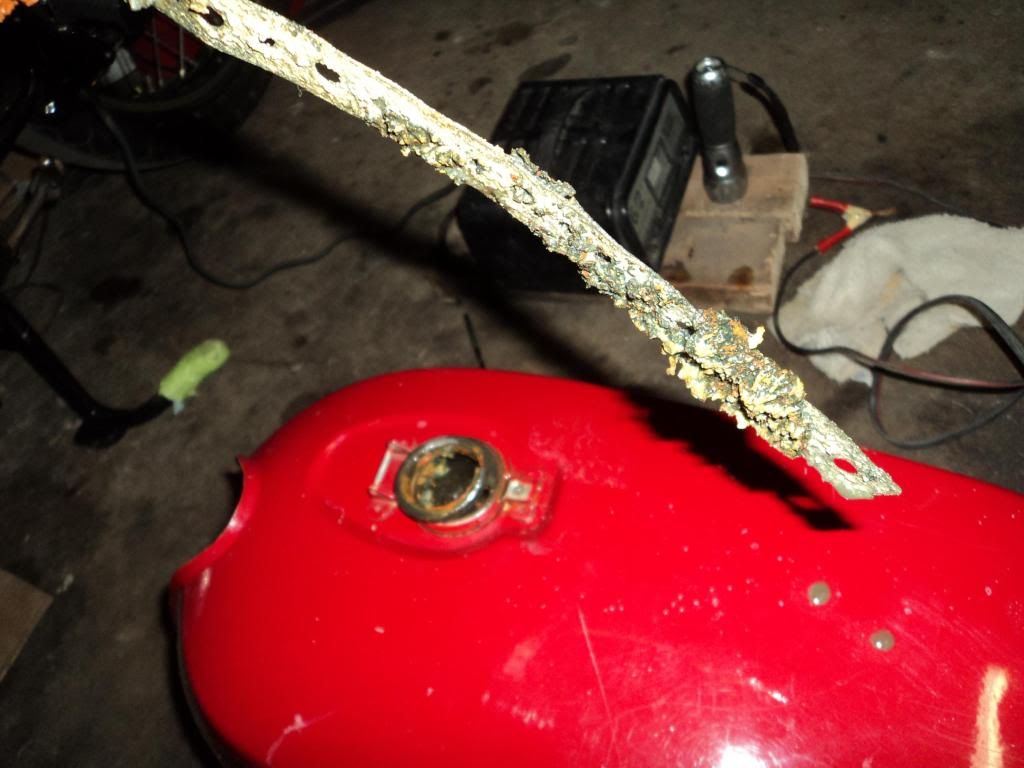
About 26 hrs of cooking this is what the sacrificial anode strap looked like.
That last pic was last night, I rinsed the tank out and greenish black completely, then on second rinse and third looked like p1ss. . .a good thing, ha. Water in again, 3 tablespoons Washing Soda for the 2.9 gallon tank, decided just to use a fresh metal strap, back in and still electrofying right now.
EDIT: I agree, ha. . . I will edit this rather than bump it back to the top.
After long enough, and three fresh tanks of muck dumped out I am very less than impressed. The photo at top is somewhat exactly what it looks like, , surface rust, and it covers the entire inside. The good is that the large clump of rust broke apart and mostly gone but still rust.
Maybe I didn't give it long enough? - (like 2 weeks), maybe could've used better sacrificial anode?, maybe tap water shouldn't be used (???). If it's what is referred to as flash rusting, it is occurring before I even get the messy stuff dumped out, the mili-second it is exposed to any bubble of air. It is immediate - in less than a flash, therefore making it impossible to get anything in before this happens. The plan was to treat temporarily with Lucas 2-stroke oil / gas mix. Not happening.
With less than stellar end results I wouldn't personally recommend.
Chemistry class experiment is over and I will try the Evaporust and / or the Por-15 kit and get it right the second time. I hope.
http://www.altelco.net/~jacil/clay/motorcycle/KElecSetup.html
http://www.stovebolt.com/techtips/rust/electrolytic_derusting.htm
http://antique-engines.com/electrol.asp
Trying this out and after aprox. 26 hr result gotta say very pleased and quite simple!
Couple before pics, could be worse. The one chunk of rust I could have scraped some but wanted to see the effectiveness of the process.
Rinsed tank out of course, found this metal strap just digging around first thing I found and figured if a coat hanger worked. . ok, so i didn't go quite that far back in the tank.
$1.99 bracket and the piece of HARD rubber (not best) but again, first thing I found, looked like from wiring harness sheathing, but it sealed up petcock opening so all good.
Water in, checked for leaking.
The good stuff, $4 at grocery store laundry aisle.
Metal strapping bent and in. Used old carb intake boot screwed to filler cap and bent then screwed down strap to the boot. Hey, , ,it was the first thing I found, HA.
Looked like i was in a hurry, but made absolute certain not touching inside of tank.
Out to the garage, the usual setup.
After merely 10 min. started seeing stuff. This was after about 20 minutes.
About 26 hrs of cooking this is what the sacrificial anode strap looked like.
That last pic was last night, I rinsed the tank out and greenish black completely, then on second rinse and third looked like p1ss. . .a good thing, ha. Water in again, 3 tablespoons Washing Soda for the 2.9 gallon tank, decided just to use a fresh metal strap, back in and still electrofying right now.
kinda reminds me of bade memories of chemistry class
EDIT: I agree, ha. . . I will edit this rather than bump it back to the top.
After long enough, and three fresh tanks of muck dumped out I am very less than impressed. The photo at top is somewhat exactly what it looks like, , surface rust, and it covers the entire inside. The good is that the large clump of rust broke apart and mostly gone but still rust.
Maybe I didn't give it long enough? - (like 2 weeks), maybe could've used better sacrificial anode?, maybe tap water shouldn't be used (???). If it's what is referred to as flash rusting, it is occurring before I even get the messy stuff dumped out, the mili-second it is exposed to any bubble of air. It is immediate - in less than a flash, therefore making it impossible to get anything in before this happens. The plan was to treat temporarily with Lucas 2-stroke oil / gas mix. Not happening.
With less than stellar end results I wouldn't personally recommend.
Chemistry class experiment is over and I will try the Evaporust and / or the Por-15 kit and get it right the second time. I hope.
Last edited:
OleDoc
FREEBIRDS MC Central NY
kinda reminds me of bade memories of chemistry class
Alrightso, I did bump this to the top anyway because I have a question I can't exactly find the answer to.
I ordered the Por-15 kit from amazon for cheapest although did not get the kit which includes the Por-Strip. I read a Motorcycle Consumer News article from April 2009 which states the importance of using the Por-Strip (as step 2, - after step 1 simply rinsing out).
My question is this: is it a bad idea to do the Por-15 without using the Por-strip to completely remove the OEM lining, as it seems to be recommended?? What will my results be long term if I skip the Por-Strip, , , or no problem??
Thanks!
I tend to agree Chris. I was thinking i may hear from those who say they have used without, especially considering Por sells the kit without the Strip stuff, so then explain that (confused).
Likely I will buy it - no hurry, and the kit (without strip) prob be another day or 3 whenever it arrives. Problem is I'll have to order and wait again since I don't think i'll find the exact stuff locally anywhere.
Likely I will buy it - no hurry, and the kit (without strip) prob be another day or 3 whenever it arrives. Problem is I'll have to order and wait again since I don't think i'll find the exact stuff locally anywhere.
I tend to agree Chris. I was thinking i may hear from those who say they have used without, especially considering Por sells the kit without the Strip stuff, so then explain that (confused).
Likely I will buy it - no hurry, and the kit (without strip) prob be another day or 3 whenever it arrives. Problem is I'll have to order and wait again since I don't think i'll find the exact stuff locally anywhere.
so if i have a new tank make i need to buy the por strip when I don't really need it?

I'm about to purchase some of the Por-15 tank cleaner. They have the standard kit and then they have the HD kit: which one have you folks used and would you recommend? The HD kit is identical to the regular besides also including a quart of their tank strip.
Local supplier only stocks the regular kit.
I just got the regular kit. Worked fine.
I guess I was thinking that covered with mainly surface rust, that I can get by without stripping the factory lining. And that the 'Metal Ready' treatment would be sufficient to have the 'Tank Sealer' work fine once surface rust removed.
Just wondered if necessary for decent long term results?
I'm really surprised the electrolysis didn't work for you. What were you seeing for amps on the charger? What was the electrode made of? Mild steel?
I'm really surprised the electrolysis didn't work for you. What were you seeing for amps on the charger? What was the electrode made of? Mild steel?
The electrolysis seemed to be doing alot and yea, , wasn't sure if surface rust not going away or complete tank returning to same in flash rust form.
Interesting you ask - i had asked above if maybe not using the right sacrificial anode. It was that metal piece of strapping which collected stuff and made the tank boil (bubbling sound) but maybe a more solid piece of steel- after the 26 hours it was actually flimsy and bent too easily so replaced with new piece of same. So "mild steel"? Yes.
As for Amperes, that old charger always shows the same as is in the picture. As if needle always at one amp. It was set on 6 (flip switch is for 2 and 6 amps), and then 12 volts. Maybe my old style charger is too old and done with although it charges batteries just fine.
My experiment was just that, and your write-up inspired me so I shouldn't conclude so quickly that it doesn't work on surface rust. Maybe should give it another go with more patience and follow your how-to more accurately. Also as i said, if a coat hanger worked, i was sure what i used would be sufficient.

The plus side is that i did see results! And almost immediately. Just not satisfactory end result. Thanks Travis.
I find that you can get the amps to increase by adding more washing soda. I usually try to keep it at around 2 amps with the charger set on 10 amps. I use a 1/4" piece of mild steel round bar. Your problem may have been with not having "line of sight" from the rust to the electrode. The process should get rid of the rust and leave a dark spot where the rust was. You could do a final acid rinse to remove that.
A lot of usable tips in this thread.. One question though, how much muriatic acid (in volume percent) does your muriatic acid actually contain? We have two different kinds here in Sweden (at least). I'm thinking that using the industry grade stuff at 27% might be overkill? Please correct me if I'm wrong.
Thanks, Stabler.
Thanks, Stabler.
A lot of usable tips in this thread.. One question though, how much muriatic acid (in volume percent) does your muriatic acid actually contain? We have two different kinds here in Sweden (at least). I'm thinking that using the industry grade stuff at 27% might be overkill? Please correct me if I'm wrong.
Thanks, Stabler.
I have a bottle of it but so far too scared to use the stuff
 It is 31.45% Hydrogen Chloride. The metal etching directions say to use 1 part acid to 20 parts water, then strengthen if necessary.
 I find that you can get the amps to increase by adding more washing soda. I usually try to keep it at around 2 amps with the charger set on 10 amps. I use a 1/4" piece of mild steel round bar. Your problem may have been with not having "line of sight" from the rust to the electrode. The process should get rid of the rust and leave a dark spot where the rust was. You could do a final acid rinse to remove that.
I thought i read that less is more. . .or at least increasing the solution would not increase results. I'm not able to set at 10 amps with that charger. The "line of sight" not so sure,, as far back as can be seen was consistently bad. Should get the Por kit (minus Stripper) today. If not I will maybe do the electrolitic again for a day because after couple days sitting it has MORE rust than before due to water.
In any case, still don't have the answer as to importance and necessity of the Por-strip. Not a new make/model tank so that.s a yes
I'm really surprised the electrolysis didn't work for you. What were you seeing for amps on the charger? What was the electrode made of? Mild steel?
Actually it did work Travis, as it broke up the largest chunks of rust. The worst flash rust probably was happening after using "Scalding Hot" water which I made the mistake of doing again after using the Por Marine Clean. So in any case I would have had to use a liner nonetheless. The reassuring part in the Por instructions was that flash rust would occur and "the coating is designed to bond with any new flash rust"
I was glad and relieved to have gotten CHUNKS of rust out. Electrolysis. THANKS!
I waited for the stuff throug the mail long enough, so besides the scalding water (on the 9th and 10th rinse after Marine Clean) i followed the instructions completely. Marine clean rolled for 25 min with quart WARM water. Duct tape did not keep filler hole sealed but the stuff didn't damage tank, wiped occasionally with a dishsoapy wet rag.
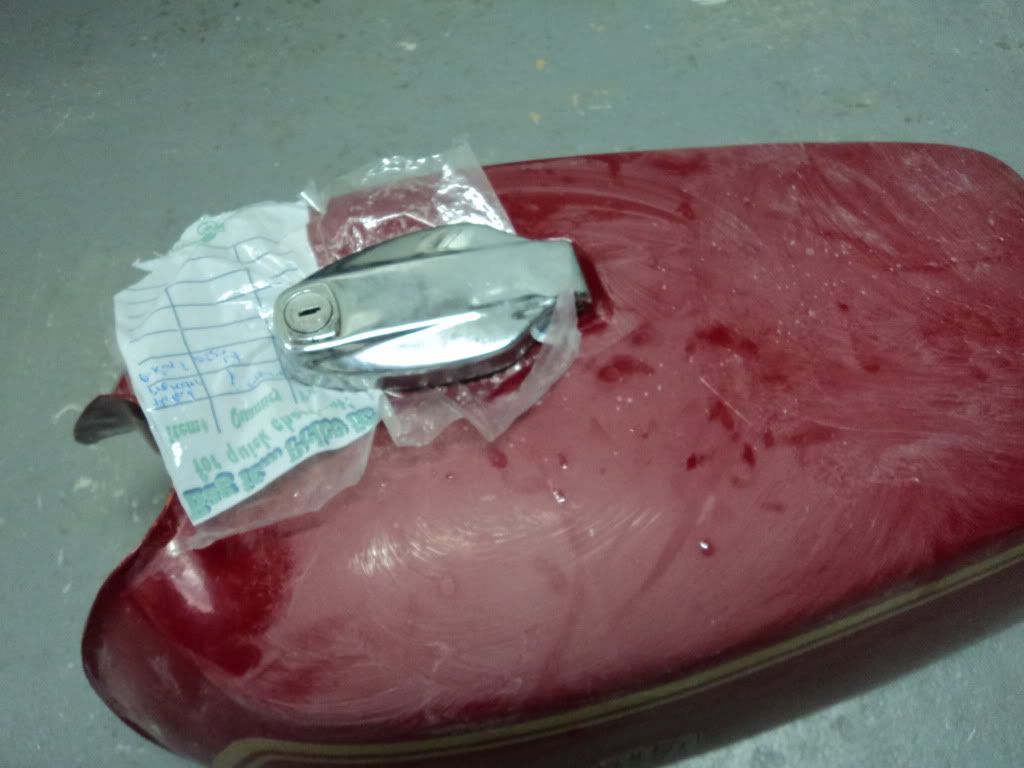
Prep and Ready -Metal Ready- not to be in tank longer than 2 hours, I ROLLED for hour and fifty min! with one bathroom break. I read a November 1986 Cycle magazine- the bike i learned to ride on- and unearth music to get through that. Rinsed countless times. It was entirely leak proof this time because i put the fuel cap on and closed it over a plastic bag like so:
Sealer --- this is where I got peeved and impatient with not having someone just get this done for me. I rolled sufficiently!! lost track of how long, about an hour. Duct tape again did not seal and kept wiping and was turtle waxing the stuff off of the tank constantly also. Then the draining mess!! Next time (never) i would 'manufacture' a drain tube to attach to the petcock hole. Bloody messed up mess. By then I was completely sure i would never do this myself again.
Tank paint suffered minimal damage, only around filler hole but not a concern since plan to have repainted, dents removed oneday.
And once it's drained it's not done. It will keep flowing like slow-mo lava wherever gravity takes it, so for a couple hours i kept repositioning it then finally took a shower and left it awhile pissed at it and sure enough, a couple high-spot streaks but nothing i'm worried about. just done already
here is the damage done but alot of that is also wax
And where one large chunk of rust once was, electrolysis
Not perfecto smooth but i'll deal with it. or not.
I forgot to mention the drying process. . .i let it heat gun dry for 3 hours.
Also don't leave heat gun jammed in filler hole, i checked it after 10 min and the heated up tank would have eventually melted the gun. I suspended it just above
Last edited:
MotleyCustoms
XS400 Enthusiast
Hey guys, i used some Works toilet bowl cleaner and it worked awesome. Just poured about 48 oz of it into my tank and left the cap OPEN because it does produce some gas, sloshed it around a bit, and let it sit for an hour and it was down to bare metal. Added water to the tank to minimize the acidity and dumped it out and rinsed with water till all the cleaner was out, force air dried and fogged it with WD 40. Still no flash rust, and looks damn good.
Last edited:
Similar threads
- Replies
- 1
- Views
- 557
- Replies
- 0
- Views
- 492