What did you do with your XS today?

maybe im over thinking it (or underthinking it :banghead: lol), but if it is in reverse and i do it from the bottom, once it bites on the bolt wont it turn the bolt counter clockwise making the bolt go back towards the top?

Sesty. It works the same from either end. That is unless there is some reason you want the bolt to go thru. The reversed drill type screw extractors work on right hand threaded bolts. Trust me (I know you don't even know me) It's easy once the bit gets a good bite on the bolt it will continue to back right out. I haven't used these yet but our maintenance tec at the shop swears by them. He has an industrial set up to 3/4". I've seen him use it in the past. the bolts just back right out like magic. Good Luck
 
Just to confirm, you are talking about the bolt which clamps the assembly to the bar.
Unlike the rear-view mirror mount, which is threaded backwards on the right side, the clamp bolts are both righty-tighty (from the top).

Therefore, drilling from the bottom, you would want to have the drill bit rotating clockwise (right) in order to back the bolt out the way it went in. From the top it's lefty-loosy.

But if you can and want to thread the bolt all the way through until it falls out the bottom (if it can) just reverse all of the above. . lol . :umm: best of luck

Lou These are wonderful trinkets to have in your bag of trix. I'm thinking if the bolt was broken clean with no snag or burr he'd be fine to work it thru. But if there is any snag hanging off the threads he'd be best to back it out the way it went in. That's where these reverse drill extractors really shine. They are a necessity for blind holes where you have to back the stump out. Even a good sharp drill bit could possibly bite enough to spin the bolt thru. :wink2:
 
Just to confirm, you are talking about the bolt which clamps the assembly to the bar.
Unlike the rear-view mirror mount, which is threaded backwards on the right side, the clamp bolts are both righty-tighty (from the top).

Therefore, drilling from the bottom, you would want to have the drill bit rotating clockwise (right) in order to back the bolt out the way it went in. From the top it's lefty-loosy.

But if you can and want to thread the bolt all the way through until it falls out the bottom (if it can) just reverse all of the above. . lol . :umm: best of luck

yes that is the bolt i snapped. picked up a screw extractor bit from my gf's dad and put a torque wrench on my xmas list. going to give it a go this weekend!

Happy thanksgiving!
 
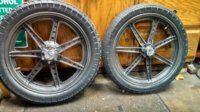
Finally got my wheels painted today. Out huffin paint in the garage again. So what do you think.
 

Attachments

  • IMG_20131129_215737_959.jpg
    IMG_20131129_215737_959.jpg
    124.2 KB · Views: 261
Got a new CDI in the mail, I was the only one bidding on it, 39.99 +S/H about 45 total. (I have not proven that mine is bad, but knowing what I did to the poor coils, I am extrapolating that I have a bad CDI. Does anyone remember a posting for testing the validity of my purchase? (I have searched, but all I remember are the ones where the new one repaired issues that we where chasing ourselves around in circles for performance issues.
 
the CDI is my most despised part on the xs :D total magic goes on inside those things, and if it breaks you'll end up chasing your own tail until you shell out the cash for a replacement in a total wild guess. I try to spray mine down with some electronics protector spray every once in a while to prevent this one from breaking. But this thing is the only part on the bike I really don't trust, and if I ever go for a long trip I'd buy a replacement and take it as a spare.
 
Fixed my leaky petcock YAY!!!! Bike back running and idling better than ever (guessing it must of been restricting flow).

On a side note, does anyone know where I can find a replacement master cylinder rubber/boot/diaphragm? Mines missing a chunk and brake fluid seems to be seeping out around the lid in the hot weather......
 
Willem. Not sure where I saw it but there was a post about repairing those mysterious cdi boxes somewhere. I think it was written by an electrical wizard in some never land where time is forgotten. But as I remember there was something about weak transistors or diodes to be replaced on the pc board. Also something about some control boxes being completely sealed with the only access being to destroy the case and then re packaging it in something for easier access.
 
Take a look at these links.
TCI rebuild
(there is no need to cut hole in cover... just unsolder 10pins that go to connectors)
some tips for TCI

This summer I also had some problems with TCI. Had cold solder joint somewhere on circuit board. Cleaned board and resoldered all connections... works like new ;)
Only thing is, at one point I will swap old capacitors to ceramic ones.... I have no faith in 30yo electrolytic caps.
 

Attachments

  • P1000444.jpg
    P1000444.jpg
    128.1 KB · Views: 288
Last edited:
Take a look at these links.
TCI rebuild
(there is no need to cut hole in cover... just unsolder 10pins that go to connectors)
some tips for TCI

This summer I also had some problems with TCI. Had cold solder joint somewhere on circuit board. Cleaned board and resoldered all connections... works like new ;)
Only thing is, at one point I will swap old capacitors to ceramic ones.... I have no faith in 30yo electrolytic caps.
some good info right there!! Thank you sir for sharing:thumbsup:
 
Yes those are nice! I'll add them into my how-to thread :thumbsup:

Last night I fine-tuned my carbs: synced them and set the idle mix and idle rpm. Was happy to see with my $3 homemade manometer that my carbs were still in perfect sync after 6 months and lots of exhaust troubles and changes. My idle mixture setting had to go a lot leaner though, since I had corrected for all the holes in the exhaust a while ago and those are now shut.

she runs better than ever now! Quiet (relatively), nimble, fast throttle response, and it feels like it has a little more mid-range power since I fixed the exhaust.
 
Yesterday - what a lovely day after all this winter. Rode around for 3 hours, 120 kms.
It was over 12 C (54F) :D when I started out at noon.
The cold front started to move through just before 3:00. Headed home when my finger tips could feel the drop.

Not as much sun as last Dec 19th, but at least it was trying. It's now back to this year's normal again @ -2C :wtf:
 
Take a look at these links.
TCI rebuild
(there is no need to cut hole in cover... just unsolder 10pins that go to connectors)
some tips for TCI

This summer I also had some problems with TCI. Had cold solder joint somewhere on circuit board. Cleaned board and resoldered all connections... works like new ;)
Only thing is, at one point I will swap old capacitors to ceramic ones.... I have no faith in 30yo electrolytic caps.


Yesterday I rebuilt my TCI :) nice sunday afternoon soldering. I was suspecting it to be in a bit of a bad shape, but most of my connections actually had cold solder joints. I already had a huge power cut for a few seconds the other day, definitely something electric. Hope that's fixed now :thumbsup:

thanks again for the how-to links !
 
and today I tested out my top speed by GPS - 147 km/h so thats 91.3 mph :) pretty decent, since the stock top speed is at 145 and the bike is as old as I am
 
rode it in 3C (37F) temps on the highway this morning, I was far from warm. Also the bike cut out on me three times because my inline fuel filter had clogged up once again... :doh:

I thoroughly cleaned the insides of the tank at the start of summer, but I guess it's time to do it again. Anyone have tips for a tank liner/curing type? I'll search the web a little but not so excited to do that, it wasn't much wrenching fun last time round
 
... I thoroughly cleaned the insides of the tank at the start of summer, but I guess it's time to do it again. Anyone have tips for a tank liner/curing type? I'll search the web a little but not so excited to do that, it wasn't much wrenching fun last time round
Either gas suppliers have failing underground tanks or your tank (or previous lining materials) must be deteriorating badly. I've been very lucky and had the same $3 in-line fuel filter for 2 years now and, luckily, no evidence of sediment.

A solution has been invented and patented, but I can't find anyone anyone making kits for us - maybe MikesXS could source one.
. . . http://www.google.com/patents/US3330439​

I think it might be my tank, I de-rusted it in early summer but I didn't go the extra mile of putting any liner in. I should've listened to the old saying "if you don't have time to do it right, when will you have time to do it over?" :laugh:

actually, it may also be dependent on the filter I use. I have one that filters even the finest little things out of the fuel, so it clogs up quicker than a coarser mesh filter. I'm not sure what the carbs will be able to handle, but they must be able to cope with some minuscule specks of dirt?
 
Back
Top