What did you do with your XS today?

Took a 45 minute drive to buy a stator and came home with a whole motor! T'was a good day. Threw the stator in and the bike runs swell! I'm elated for the start of my season :D
 

Attachments

  • IMG-20120427-00311.jpg
    IMG-20120427-00311.jpg
    300.7 KB · Views: 232
Used my new blaster :D Can't wait to blast some engines:bike:
 
Last edited:
nice xschris :D

I went to Stafford classic bike show today with two of my XS's.

My friend used the red one and I went on the tracker. Did 130 miles and it didn't rain :)

Result!
 
D0-Boy glad your stator was switched out. You can probs reseal/epoxy the old one and sell it off. It's not hard to reseal them.

Congrats on the spare engine!
 
I took pics of some of the bikes and parts to help others fix there problems. The sun was out but to cold the ride.
Leo
 
Lapped the valves - first time I have ever done this.
I am too cheap to spend $20 on the wooden-stick-and-suction-cup tool so what I did and was to get a short length of fuel line and pushed it over the valve stem after I had inserted the valve into the head. Then you can spin the fuel line in your hands as per usual (only from the other side of the head).

It worked great. :thumbsup:

******************************

I did a second round of painting and it turned out much better. I noticed that the paint will dry before it hits the ground so you do have to be the 8-10 inches away from the object otherwise the painted surface has a rough/powdery texture.

It seems the trick with using VHT engine paint (cast iron) is to do the dusting first and second coat 10 minutes apart but only wait about 2 minutes to do the third heavy coat. The last coat has to be thick and shiny (almost running) otherwise it turns out rough and dull and will not leave a nice glossy sealed finish to the paint.

What do you guys think of how the drum brake turned out?
 

Attachments

  • IMG_5681.jpg
    IMG_5681.jpg
    222.2 KB · Views: 206
porkchoppy- paint looks good, i used appliance apoxy paint for mine and it worked well to, same stuff you can paint your old oven with!

oh and on my xs today i made new 2-into-1 pipes and wired it to see how it runs, check out my build thread for the video
 
had a good old back to the start strip and clean the carbs ....... and put them back on and for the first time i seen the old girl run ....... i must be doing some thing right
now just need to replace the fuel line i split :( but im getting close to getting her back on the road
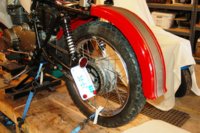
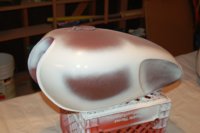
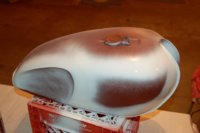
 
Thanks guys.

Fubar, is the appluance epoxy uv resistant?
Drewpy, I haven't heard of simonz paint. Hopefully the VHT will be tough enough once I bake it in the oven.

Posted via Mobile
 
I reinstalled the valves. The first 3 were pretty easy but the 4th was a complete bugger. It was late & I had run out of coordination so it took longer than the first 3 combined.:banghead:
I can recommend using a proper tool to do this- even if it is home made.

Also, I have enough valve grinding paste to do hundreds of engines.

Posted via Mobile
 
Took out the bike for a test drive after dialing in the carbs to finally work without the choke on all the time. Rode it up to the gas station to fill up the tank and tires and dusted a ricer on my way back home. It's all set for insurance...when I can afford it...
 
Finished assembly of rear end. Lots of headway on the fuel tanks.
 

Attachments

  • DSC_0253.JPG
    DSC_0253.JPG
    272.7 KB · Views: 203
  • DSC_0254.JPG
    DSC_0254.JPG
    254.3 KB · Views: 178
  • DSC_0256.JPG
    DSC_0256.JPG
    186.1 KB · Views: 190
  • DSC_0263.JPG
    DSC_0263.JPG
    187.7 KB · Views: 188
  • DSC_0262.JPG
    DSC_0262.JPG
    189.8 KB · Views: 197
  • DSC_0259.JPG
    DSC_0259.JPG
    189.4 KB · Views: 180
Finished assembly of rear end. Lots of headway on the fuel tanks.
Painting Sucks!

I am convinced that type A personalities should stay away from painting - we either get caught up in the perfection trap, or rush things or both.

The lesson is that, if you are applying two colors of paint near each other, be sure to let the first color dry adequately before taping up the masking for the next color.

In my case, the masking tape adhered to the fresh paint that I 'thought' was dry enough. In addition, the masking paper I used did not have a wax/plastic backing and stuck to the nice new white paint it was supposed to be protecting! :banghead:

I think adequate 'drying time' is going to be 48-hours for me from here on in. Which returns me to the earlier premise; about painting sucking, that is. It moves at a glacial pace.

Thirty seconds of painting, 2-days of drying, repeat...

I guess that's why I never tried to make a living in body & paint :laugh:
 
:agree: I use a heat gun to quicken the pace of the drying. :thumbsup: Speaking of which: I touched up the paint to the Yamaha emblems on the engine, which looks pretty damn sexy next to the polished covers. :)
 
Back
Top