-
Enjoy XS400.com? Consider making a donation to help support the site.
XS400.com receives a small share of sales from some links on this page, but direct donations have a much greater impact on keeping this site going.
You are using an out of date browser. It may not display this or other websites correctly.
You should upgrade or use an alternative browser.
You should upgrade or use an alternative browser.
My '76 XS360C Restoration
- Thread starter iamunique127
- Start date

iamunique127
XS360C Owner
I'm embarassed to say what it is.

iamunique127
XS360C Owner
OK, you got me. I was looking around my workshop for something that would work and it jumped out at me. We'll see.
jthiessen
XS400 Addict
How does your master cylinder sit with those drag bars? Mine would roll forward enough before the banjo bolt hit the fork. Is it a stock unit?
iamunique127
XS360C Owner
I haven't tried actually setting them up with the tank on, etc. The bike is still up on jack stands so the front wheel is off the ground.
Did I see you solved that problem with a file?
Did I see you solved that problem with a file?
jthiessen
XS400 Addict
Keep us posted on fitment!
I haven't had time lately, but it's the next to-do!
Did I see you solved that problem with a file?
I haven't had time lately, but it's the next to-do!
briansal
XS400 Enthusiast
awesome, great find! give that thing a bath and keep the photos coming!
those gauges are awesome. resemble the mid 70 CB's. Much cooler than my 78 xs400's.
My 78 has the same gauges as this bike.
Great job so far on the resto looks amazing. Sorry to see the origional windsheild go though. lol
iamunique127
XS360C Owner
Thanks Calgary
The windshield is colour coded to the bike but I think it will be a bit high for the flat bars I hope to use. We'll see.
The windshield is colour coded to the bike but I think it will be a bit high for the flat bars I hope to use. We'll see.
iamunique127
XS360C Owner
How does your master cylinder sit with those drag bars? Mine would roll forward enough before the banjo bolt hit the fork. Is it a stock unit?
I know I'd seen someone who had addressed the brake hose fit with a file and I came across the thread again. Check out jthiessen's build, post #53, here:
http://www.xs400.com/forum/showthread.php?t=11791&page=3 for one way to do it.
I've ordered a 90º bend banjo for mine. I'll see how that works and let you know.
iamunique127
XS360C Owner
I'm finally getting around to posting some updates.
Got to the battery box. It was the rustiest part of the bike. I guess the water was held there by the rubber battery pad.

A little wire brushing and some rust paint fixed it up.

Next, tires.
Got to the battery box. It was the rustiest part of the bike. I guess the water was held there by the rubber battery pad.
A little wire brushing and some rust paint fixed it up.
Next, tires.
the rust is through electrical/sulphuric acid fumes from the battery.
that's why its important to vent the battery tube as Yamaha instructs")
that's why its important to vent the battery tube as Yamaha instructs
iamunique127
XS360C Owner
Thanks drewpy. There was a vent tube. I took a photo of how it was routed. It seemd correct but I'll make sure to replace it the way it shows in the parts manual.
Received my new tires this week and mounted them up.
This is what the old stock tires looked like. The date codes were from 1975.


New tires and tubes

Kenda Challenger K657's, 100/90/18 front and 110/90/18 rear. Date code September and October 2013.

Both front and back wheels and rubber strips were in great shape, like this

I did replace both rim strips with new ones though.
I'm happy with the finished product. The whole change over took about an hour.

I've mounted the front wheel on the bike and it wobbles a bit so will need some truing and probably balancing. That would explain the cupped ribs on the old tire. The swing arm is off so I don't know about the rear yet. I hope to get at it all this week.
Received my new tires this week and mounted them up.
This is what the old stock tires looked like. The date codes were from 1975.
New tires and tubes
Kenda Challenger K657's, 100/90/18 front and 110/90/18 rear. Date code September and October 2013.
Both front and back wheels and rubber strips were in great shape, like this
I did replace both rim strips with new ones though.
I'm happy with the finished product. The whole change over took about an hour.
I've mounted the front wheel on the bike and it wobbles a bit so will need some truing and probably balancing. That would explain the cupped ribs on the old tire. The swing arm is off so I don't know about the rear yet. I hope to get at it all this week.
Last edited:
iamunique127
XS360C Owner
Happily, I find my new rear tire doesn't rub the chain guard (altho I see my R passenger peg is a bit droopy).

Got my new pipes fully installed today and made up a bracket to keep the centre stand from banging on the left pipe. Fashioned the stop from this old iPhone dock/card reader. It's fairly heavy aluminum.

Made the bumper from a hunk of rubber I've been carting around in my Junk Rubber box for at least 30 years. I'm glad I finally found a use for it.

The bracket bolted on the inside of the stock pipe hanger, below the rear foot peg.

It holds the pipe away from the pipe with about an inch clearance. If I find it's too low I can shorten it up.

Here's how the bike's looking from the side

and from the back.
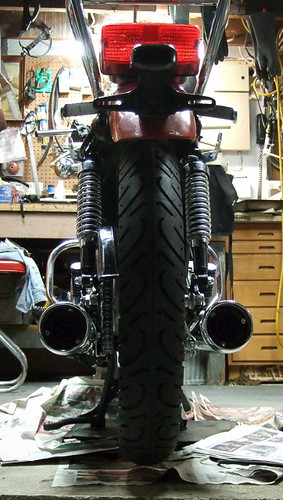
I'm liking the way the pipes look and hope they sound as good.
Last thing to clean up is the tail light housing, then I can move on to getting it running.
Got my new pipes fully installed today and made up a bracket to keep the centre stand from banging on the left pipe. Fashioned the stop from this old iPhone dock/card reader. It's fairly heavy aluminum.
Made the bumper from a hunk of rubber I've been carting around in my Junk Rubber box for at least 30 years. I'm glad I finally found a use for it.
The bracket bolted on the inside of the stock pipe hanger, below the rear foot peg.
It holds the pipe away from the pipe with about an inch clearance. If I find it's too low I can shorten it up.
Here's how the bike's looking from the side
and from the back.
I'm liking the way the pipes look and hope they sound as good.
Last thing to clean up is the tail light housing, then I can move on to getting it running.
iamunique127
XS360C Owner
While putting my controls on the bars I found I'd overlooked cleaning the left one. It was gummed up and very sluggish.

Some varsol, a bit of white lithium grease and a few minutes later and it was good as new.

I don't have a timing light at home right now so I quickly checked the static timing. Found the points open at different times on each side so I'll have to move the plate to set the left first.
Dumb question: my manual says the points should open at the "LF" mark. It says LF then there is a short line, then a long line, then 2 short lines. Do I want the points to open when the arrow points to the actual LF or to one of the lines? My left points open at the long line and my right points open right at the "RF" mark.
It seems to me the points look OK but maybe someone with experience can tell me what they think of the condition. I've set the gap to .014

Some varsol, a bit of white lithium grease and a few minutes later and it was good as new.
I don't have a timing light at home right now so I quickly checked the static timing. Found the points open at different times on each side so I'll have to move the plate to set the left first.
Dumb question: my manual says the points should open at the "LF" mark. It says LF then there is a short line, then a long line, then 2 short lines. Do I want the points to open when the arrow points to the actual LF or to one of the lines? My left points open at the long line and my right points open right at the "RF" mark.
It seems to me the points look OK but maybe someone with experience can tell me what they think of the condition. I've set the gap to .014