Motor tear down has begun!!!!

Greasey Fingers

XS400 Guru
Top Contributor
Messages
1,069
Reaction score
15
Points
38
Location
Australia
Motor tear down has begun!! (xs250 xs 250 engine disassembly/rebuild thread)

Hey guys me and my brother pulled the motor out today and started the tear down:yikes: Nah its not that daunting just ive never pulled down a motor before and neither has my brother. You may remember a post i made a while ago about the 2nd gear being knackered, well this is all an effort to get to the gear box and replace the worn part and anything else that we find on the way that needs attention. Im planning to do a reasonably detailed log of the tear down in this thread with plenty of photos. So hopefully it may be of use to someone later down the track. Ill be documenting it in 'stages' each stage will represent a session of work from start to finish. Wish me luck!!

EDIT: The reassembly thread can be found here >>> http://www.xs400.com/forum/showthread.php?t=6874&highlight=tear+begun

STAGE 1
So far it has been pretty straight forward. We did hit a bit of a problem that stopped us, so i already need HELP from you guys!!!:thumbsup:....ANY help and advice is of course GREATLY appreciated....More on tthe prob after i show you what we have done and where we are up to.

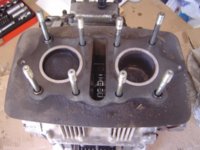
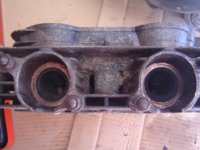
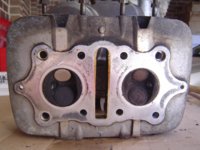
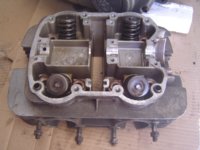
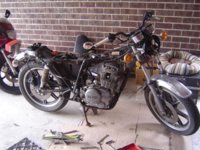
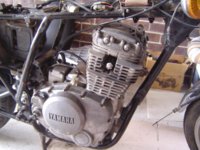
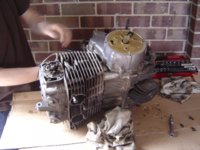
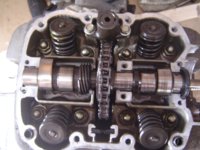
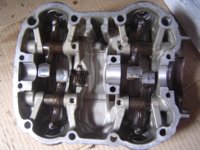
OK so motor is out obviously:
 

Attachments

  • DSC02620.jpg
    DSC02620.jpg
    299.7 KB · Views: 372
  • DSC02621.jpg
    DSC02621.jpg
    205.5 KB · Views: 406
  • DSC02622.jpg
    DSC02622.jpg
    226.2 KB · Views: 382
  • DSC02623.jpg
    DSC02623.jpg
    230.6 KB · Views: 411
  • DSC02624.jpg
    DSC02624.jpg
    264.3 KB · Views: 395
  • DSC02625.jpg
    DSC02625.jpg
    209.2 KB · Views: 402
Last edited:
Camshaft cover is off, camshaft and sprocket are out. Things look to be in good condition to me, what do you guys think?
 

Attachments

  • DSC02630.jpg
    DSC02630.jpg
    201.1 KB · Views: 374
  • DSC02629.jpg
    DSC02629.jpg
    172.9 KB · Views: 384
  • DSC02628.jpg
    DSC02628.jpg
    178.3 KB · Views: 398
  • DSC02627.jpg
    DSC02627.jpg
    191.3 KB · Views: 416
  • DSC02626.jpg
    DSC02626.jpg
    230.2 KB · Views: 391
Now the problem :banghead: 
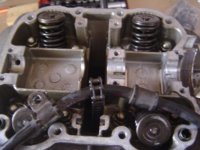
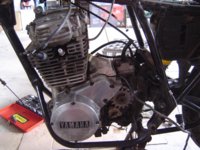
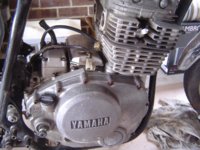
After loosing the 8 acorn bolts in the sequence and method explained in the manual, i hit one acorn bolt that semi stripped. I felt it strip and immedietly stopped work from that point to ponder the situation.
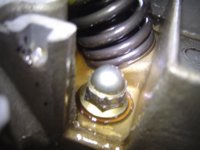
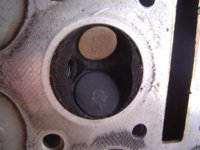
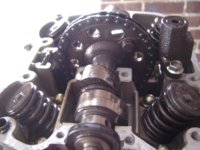
We decided the best thing at this point would be to torque them all back up to take the pressure of the semi stripped bolt, then try to loosen it again once the others are tight. And if successful work our way around the other ones which have all mostly been loosened enough to break the initial seal. So im waiting till my brother comes down next with his torque wrench.

If you look at the 2nd photo in the post above, it is the second nut on the bottom row (sitting directly to the left of the camchain)

So thats my dilema, anyone had similar experience or good tips to help remove the offending nut??

In the worst case senario, how would a pro mechanic in a shop remove a totally stripped acorn nut?
 

Attachments

  • DSC02631.jpg
    DSC02631.jpg
    128.1 KB · Views: 400
hi greasey fingers.

when you loosened the nuts in order did you completely loosen each one all the way one after the other or did you loosen them a few turns each at a time?

looking at the picture it doesn't look completely gone, maybe spend them money on a very good quality socket with a good fit, and or as you said tighten them all up again then try just cracking that one then continue in order.
 
Hi Large,thanks for listning to my dilema:) I loosened them bit by bit but i think i did a couple too loose in comparisone to the others. I was trying to just do it till i got a few little 'cracks' then move onto the next bolt.

I have a feeling this nut and the one to the left of it were already slighty burred before i started on them. If you look at the photo with the camshaft still in,that is before i attempted any of the acorn nuts. And if you look closly at the two on the bottom left, they look a little more worn than the others. Or maybe its just a shadow or something.

Anyway getting back to what you said about the socket i think you are onto something. My brother also said he will bring down his sockets which are the pricey type and try them. Mine arent shit but they arent the best either, probably in the middle somewhere.
 
Hi mate, on a side note, did you see the hard tail xs250 in melb that went for $350 on ebay? I was tempted to bid but shipping to syd deterred me.

Posted via Mobile
 
you may have to get an imperial sized 6 sided socket and hammer it on the nut to crack it open
 
Weld a larger nut on top of the acorn nut. Between the new surface area of the newly welded on nut and the heat from the welding, the acorn nut should come off easily.
 
mine was like that. i just too a craftsman deepwell socket of the right size. cant remember if it was a 12 or what it was, but i then put an extension on it with a breaker bar. all of this is 3/8 drive, 1/4 sucks. lol and i hit it with a hammer as i turned it. the shock fromt the taps with the hammer must have done the trick, becasue it came right off. but the nut was stuck in the socket. nothing a screwdriver cant fix tho lol.
 
Hey thanks for all the helpful replies guys! Thats what this forum is all about for sure. I definatly reckon that nut is gonna be coming off:thumbsup:

@Pork chop hi mate yeah i did see that 250 frame on ebay, that was a good deal but i wasnt gonna bid cause im not really going down the hardtail path atm. Did you see the xs400 motor on ebay in newcastle.The listing is not there now but i have the guys mobs if you want it. The top end was seized though.

@Drewpy thank mate for popping by i was hoping you would! Hammering on an imperial is definatly an option if a good quality deep socket wont work.

@JMD forest, nice one i wouldnt have thought of welding the nut on top (i was thinking more along the line of angle grinding a slit in the top as a last resort) your idea makes perfect sense and will be my last resort of choice(the slit in top idea sucks now), thanks for the help!

@volcomskater, thanks for your insight at least i know it has happened before and been fixed. Your method is what i will be trying first and ill be doing the hammer trick too i think to help it along. If that dint work ill go with drewpys imperial trick. If that dont work ill go with JMD's welding trick but i would have to take the motor to a mates house cause i dont have a welder so im hoping i dont have to.

It is comforting to know though that it WILL be coming off:laugh: Thanks again guys hopefully i organise the next session on this motor soon and come back with some good progress!
 
np man. i tore mine down too, so anyquestions about removal of tranny bits and shift selectors just let me know. (i swapped cases) <- that was a blast.

Awsome!! Thats really good to know, thanks heaps!...I think thats where im going to have to be really careful reassmbling the tranny, i definatly dont want to make any mistakes there so im sure ill be asking you plenty of questions. Was your other case damaged is that why you swapped cases? Whats it like to put back together?
 
kickstart journal bearing was cracked off. and i wanted a kick only bike. so i swapped cases and rebuilt it all. that plastic thing with the 3 screws by the oil pump SUCK. had to use a drill press and an easy out the get those to give. just saying lol.
 
Cool man the more little thing like that i know beforehand the better, then ill already be prepared for it when i get there:)
 
Yeah, i contacted that guy in Newcastle - he would take $150 forthe lot but it looked like junk - a lot of corrosion and not really worth it considering that an rd250 and xs250 in parts only went for $430.

Posted via Mobile
 
do yourself a favour and buy an impact driver. use it on everything and don't wait till you have chewed the heads to bits
 
Thanks for this! Going to be a HUGE help (and inspiration) to us building newbies!

No detail too small, i'll be following your path in a few months. :thumbsup:
 
Thanks for this! Going to be a HUGE help (and inspiration) to us building newbies!

No detail too small, i'll be following your path in a few months. :thumbsup:

Hey man no worries...but sounds like its gonna be the blind leading the blind cause im a newbie to this:laugh: At the very least i will show you what NOT to do, like stripping acorn nuts. Drewpy, i might have to look around for that impact gizmo. Havent been able to organise another session on the tear down yet but i will when i can.
 
Finished another session on the tear down today. We had a bit of this:cheers:
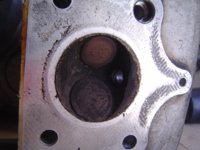
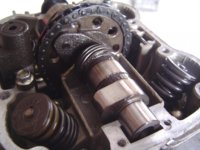
and also a bit of this:banghead: Good news is the stripped nut came off easy with a good quality deep socket. Bad news is we broke 2 small peices of fins trying to pursuade the block to come loose. Its only cosmetic but it really sucks.

What i have learnt so far, and i am learning a lot, your tools are the most important thing when tearing down an old motor like this. You cant have some half arsed socket set, you need the good quality set that costs money. They will pay for themselves by preventing f$#k ups happening in the first place. So at this point i would say most important is: GOOD TOOLS.

Anyway that my little rant over for now, ill get into todays session.

STAGE 2
Cylinder head off, block off, pistons out.

Cylinder head was no problems, a few light taps with the rubber mallet and it came free and was easy to pull off and away.
 

Attachments

  • DSC02662.jpg
    DSC02662.jpg
    162.4 KB · Views: 342
  • DSC02661.jpg
    DSC02661.jpg
    173.7 KB · Views: 326
  • DSC02660.jpg
    DSC02660.jpg
    194.7 KB · Views: 318
  • DSC02659.jpg
    DSC02659.jpg
    214.4 KB · Views: 362
  • DSC02658.jpg
    DSC02658.jpg
    234.5 KB · Views: 326
  • DSC02657.jpg
    DSC02657.jpg
    195.5 KB · Views: 348
  • DSC02664.jpg
    DSC02664.jpg
    168.8 KB · Views: 350
  • DSC02665.jpg
    DSC02665.jpg
    161.7 KB · Views: 321
Back
Top