Motor tear down has begun!!!!

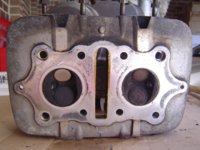
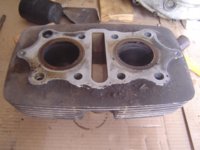
Just in case any one would like to know how im polishing heres what i have been doing, after the part has been well degreased.

1- Apply the cover with paint stripper (be sure to cover or remove any rubber seals) Do not use paint stripper if you wish to keep the black background paint for the yamaha logo, i wanted it gone. The stripper also removes clearcoat which makes polishing easier, and also helps to remove general crap.
2- Wait 15min and hose off with water
3- Get a bucket of warm soapy water, make it plenty bubbly, and give it a really good scrub with a metal scourer like what you scrub pots with.
3- Hose off and let dry
4- Start with 400 grit wet/dry and apply small amounts of wd40 or oil and work away at it and get it nice
5- Take it down to 800 grit (optional) and then clean with paint thinner
6- Buff it with black compound
7- Buff with green compound
8- Remove any wax with paint thinner
9- Polish off with a soft clean rag

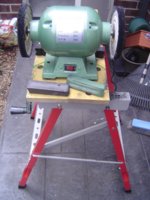
I bought a cheap bench grinder but you could use a power drill i guess with a soft buffing fitting. Heres my cheap and very underpowered set up, it would be a much faster process if the bench grinder had more grunt...
 

Attachments

  • DSC02731.jpg
    DSC02731.jpg
    185 KB · Views: 301
Well we pulled apart the tranny today. I must say that once your into the motor and gearbox, its not as complicated as you would think it is. This is coming from a newb, lol. It was a big thing for me to attempt when i started, but once in and at it, it all seems ok and do-able. As mentioned before by others its mainly getting bolts off without stripping them that is the most important thing. And try to not break f*#king fins, lol.

I found that if you just go slowly and take your time its all good, and if you hit a problem stop and leave it and just think about it and come back to it later. But i guess its easy to pull something apart, putting it back together is the critical part, lol. Ill make a new thread for reassembly i think, otherwise this one is just gonna get waaaaay to big.

And thanks again volcomscater77 & Fubar for your AWSOME and very helpful threads to do with the tranny:

HOW SPLIT THE CRANKCASE - by volcomskater77
http://www.xs400.com/forum/showthread.php?t=4843

CRANKCASE INTERNALS CHECK, PARTS REMOVAL - by FUBAR
http://www.xs400.com/forum/showthread.php?t=5558


Stage 3

Gearbox dissassembled and problem gears located, tear down is complete:thumbsup:
 

Attachments

  • DSC02782.jpg
    DSC02782.jpg
    206.2 KB · Views: 316
  • DSC02783.jpg
    DSC02783.jpg
    200.8 KB · Views: 325
  • DSC02797.jpg
    DSC02797.jpg
    212.1 KB · Views: 337
  • DSC02787.jpg
    DSC02787.jpg
    184.3 KB · Views: 335
Last edited:
heres the offending gears, there were multiple teeth broken on both the main shaft and the lay shaft (2nd gear). Nasty business:yikes:
 

Attachments

  • DSC02793.jpg
    DSC02793.jpg
    206.9 KB · Views: 296
  • DSC02790.jpg
    DSC02790.jpg
    175.6 KB · Views: 294
  • DSC02786.jpg
    DSC02786.jpg
    163.3 KB · Views: 289
  • DSC02784.jpg
    DSC02784.jpg
    185.7 KB · Views: 319
And heres what greeted us when we opened that little box under the gearbox that filters some of the shit from your oil. Found another fragment in the bottom of the gear box.
 

Attachments

  • DSC02788.jpg
    DSC02788.jpg
    239.6 KB · Views: 318
  • DSC02789.jpg
    DSC02789.jpg
    296.2 KB · Views: 311
everything went pretty smoothly and didnt really find any nasty surprises other than what we were expecting. I was worried the kickstarter mount might be cracked as that seems fairly common problem but it was all good. The only thing that was broken was a peice of non critical engine casing that is located above the front sprocket. The screw hole is still usable so im not too worried about it.
 

Attachments

  • DSC02795.jpg
    DSC02795.jpg
    181.9 KB · Views: 291
  • DSC02794.jpg
    DSC02794.jpg
    148.6 KB · Views: 297
Just wondering how you guys would clean out the tranny cases. Is it cool to spray it down with degreaser then hose off with water using a pressure hose at the local carwash?
 

Attachments

  • DSC02797.jpg
    DSC02797.jpg
    212.1 KB · Views: 294
And the cyclnder head, block and fins etc, how would you guys clean up this stuff? Is soda blasting the way to go for all of it?
 

Attachments

  • DSC02664.jpg
    DSC02664.jpg
    168.8 KB · Views: 256
  • DSC02662.jpg
    DSC02662.jpg
    162.4 KB · Views: 257
  • DSC02661.jpg
    DSC02661.jpg
    173.7 KB · Views: 238
  • DSC02659.jpg
    DSC02659.jpg
    214.4 KB · Views: 238
  • DSC02658.jpg
    DSC02658.jpg
    234.5 KB · Views: 253
  • DSC02657.jpg
    DSC02657.jpg
    195.5 KB · Views: 262
  • DSC02667.jpg
    DSC02667.jpg
    171.5 KB · Views: 232
everything went pretty smoothly and didnt really find any nasty surprises other than what we were expecting. I was worried the kickstarter mount might be cracked as that seems fairly common problem but it was all good. The only thing that was broken was a peice of non critical engine casing that is located above the front sprocket. The screw hole is still usable so im not too worried about it.

that's were a chain let go i think
 
i used an industrial dish washer :wink2:

:laugh: nice one, what cycle did you use? Well i bet it came out clean. I probably could fit them in my dishwasher one half at a time but my girlfriend would probably go pretty mental on me so i better not, lol.
 
And the cyclnder head, block and fins etc, how would you guys clean up this stuff? Is soda blasting the way to go for all of it?

I used CRC Gasket Remover, sprayed on, let soak 5-10 min, used plastic paint scraper. It took multiple spray applications but worked fine. Maybe Permatex is better.

Noticed you have the brass exhaust pipe gaskets still in, I would remove those and replace. Also would need to remove just to clean anyway, maybe use L-shaped pick to get them out.
 
And the fins I totally soaked in WD-40 and let sit, then used a thin bristle brush. Maybe even wire cut the brush down and use in a drill :wink2:
Also at walmart you can get a cheap oscillating detailer thing, but find the seperate extra accessory brush package too. works great with rubbing compound.
 
Hi Dark thanks for the tips, ill give the fins a spray with wd40 and do the wire brush thing for sure. I have a little wire brish fitting for my drill so that should work well i hope!

Im a little but aprahensive about cleaning out the head, i dont wanna leave any loose bits of crap in there and im not sure about the valves. Should i be taking out the valves and are they easy to put back in properly?

Also if you decarbon the head/pistons etc and DONT replace the rings, will the motor smoke? The rings all look good to me and i dont really want to replace them if i dont have to because they are like 130 bucks??!!! just for a few little peices of metal, what a rip off!
 
A little tip that I have yet to confirm personally, but I'll be giving it a go. A mate polished the fork lowers on his bike, they came up ok. Then he cleaned them and sprayed them a coat or two with clear. I've seen one finished fork leg next to the other that has been polished and awaiting to be painted and the difference is amazing. The clear really glosses up the finish. Don't know how the clear coat will last on engine pieces though.
 
Also if you decarbon the head/pistons etc and DONT replace the rings, will the motor smoke? The rings all look good to me and i dont really want to replace them if i dont have to because they are like 130 bucks??!!! just for a few little peices of metal, what a rip off!

right?!?!?!!? like WTF do they really have to be that expensive? and i had my engine steam cleaned in this big parts washer degreaser at my dads work. super heated water and it sprayed all the crap off.

as for valves, when you buy a new gasket kit, you should get new valve guides. if you have the ability to get them out and lap them, thats never a bad idea. just make sure the lapping compound is all off when you re-assemble tho. that compound is an abrasive, and will eat stuff apart. saw a kid leave the lapping compound on the valves when he re-installed them in small engines class. i just let him do it and didnt say anything. i was waiting for the show we all get when he had little to no compression. while it was running lol. just kept suckin air
 
It sucks they don't make any aftermarket pistons or rings for these things:banghead: They stopped making these bikes (in the u.s.) in 82 not much left for parts.
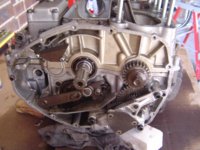
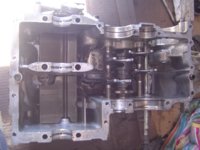
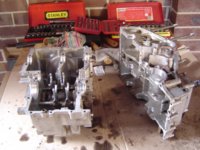
 
Hi Dark thanks for the tips, ill give the fins a spray with wd40 and do the wire brush thing for sure. I have a little wire brish fitting for my drill so that should work well i hope!

Im a little but aprahensive about cleaning out the head, i dont wanna leave any loose bits of crap in there and im not sure about the valves. Should i be taking out the valves and are they easy to put back in properly?

Also if you decarbon the head/pistons etc and DONT replace the rings, will the motor smoke? The rings all look good to me and i dont really want to replace them if i dont have to because they are like 130 bucks??!!! just for a few little peices of metal, what a rip off!

Not so sure about wire brush, narrow thin long bristle brush. I actually started with gun cleaning brass brush in drill and you have to be very, very careful and I stopped after testing in an inconspicuous spot, ha.

A Valve Spring Compressor makes it real easy if you just keep track of pieces. . and have the right Spring compressor for the job. It would cost maybe $40 but you might find the right one to rent at auto store. Maybe. I will try to find a pic.

Don't recall exactly what I paid for piston rings (I will have to look again) but considered it worth it and the bike was beaten and battered with 14k miles. I had a shop hone/croshatch the cylinders. The de-carbon method was alot of careful chipping, carb cleaner, and used 0000 steel wool. Valve lapping? . .. what Hough said! But simple and worth it if you planned to take valves out anyway.

I guess depends on a little more time and a little more elbow grease, but try to get rid of larger carbon deposits and just put a lint free (preferably) cloth in and over the barrels, like a ripped up bed sheet maybe, ha. That always goes over well :laugh:
 
Back
Top