Petew XS400 brat scrambler build

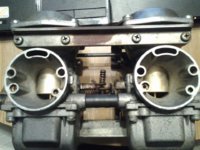
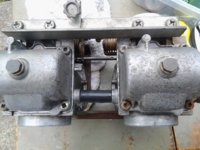
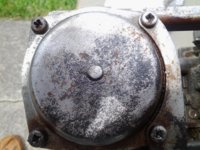
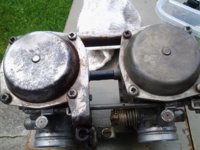
...and then there is the moment you would like to kick the PO's butt....virtually every screw is stripped out on my carbs, the appear to have been put on under power and reefed on pretty hard. I cannot get them to budge. I am going to soak the whole mess in solution and hope that loosens them up. After a trip to the hardware store to find replacement screws I work at the stripped screws with my newly acquired needle nose vise grips and was able to get all freed up...that was a relief. I have done some cleaning of the float bowls and the floats and the carb bore. Next up cleaning the little tubes and orifices...This whole project has been learning by doing and loads of helpful hints and links from folks on this forum.
 

Attachments

  • f1.jpg
    f1.jpg
    117.3 KB · Views: 279
  • f2.jpg
    f2.jpg
    159 KB · Views: 245
  • f3.jpg
    f3.jpg
    127.8 KB · Views: 243
Last edited:
You will need to remove those brass plugs that cover the pilot mix screws. There are threads on this. Also on the xs650 forum as the 80-84 xs650 used the same style carbs. Have you done a compression test of the motor. The carbs cleaning vid you posted is for the 77-79 xs400 carbs. Some things are the same but also some are very different.
 
You will need to remove those brass plugs that cover the pilot mix screws. There are threads on this. Also on the xs650 forum as the 80-84 xs650 used the same style carbs. Have you done a compression test of the motor. The carbs cleaning vid you posted is for the 77-79 xs400 carbs. Some things are the same but also some are very different.
I have done compression test both cyls.were around 118-120. I found the carbs different but I was able to disassemble and clean much already. I will look for the threads you mentioned. Upon doing the research I find that that the plugs have already been removed from the pilot mix jets and i was able to remove them.I soaked and cleaned the jets that I removed from the carbs and air pressure blasted all the passages. Do I need to replace the jets if no damage is noted and they are clean?
 

Attachments

  • g1.jpg
    g1.jpg
    105.2 KB · Views: 247
Last edited:
Not jets, pilot mix screws. Also your compression is very low. A good motor should be around 145-155 dry. Anything under 125 is bad. I would try to set the valves if you have not already and do a wet and dry test. My guess is you rings are shot. That would explain the crank case backfire.
DSC03275.JPG
 
Not jets, pilot mix screws.
View attachment 30032
Thanks for the clarification. have drilled part way into the cap and screwed a sheet metal screw into it, careful not to drill thru the cap. Eventually I was able to work them out and remove the pilot mix screws. I have them soaking now and I cleaned the bore with some carb cleaner and compressed air. Except for a little buildup of crud around where the spring meets I see no issue with these. I have read, I believe, that if I take these down to soft seat and then back them out 3 1/2 turns it will give me a good baseline starting point...correct?


Last edited:
I have not been able to adjust the valves properly, my automotive set of gauges does not have a feeler gauge thin enough to be accurate. I am going to purchase a set tonight and go through the valve adjustments.It cranks strong and acts like it wants to fire but it isn't getting fuel.I will run another compression test on it tonight also.
 
When you removed the screws did you take out the washers and o-rings? Make sure not to loose them. 3 turns out is a good starting point. The type of air filters you have ( looks like emgo brand) are not good for tuning with these bikes. Uni or real K&N are a much better option if you are going away from the best setup which is stock filters and boxes.
 
When you removed the screws did you take out the washers and o-rings? Make sure not to loose them. 3 turns out is a good starting point. The type of air filters you have ( looks like emgo brand) are not good for tuning with these bikes. Uni or real K&N are a much better option if you are going away from the best setup which is stock filters and boxes.
I will be taking the carbs back off now. It was cranking and wanting to start and then fuel started dumping out the left side of the carb "H". I don't know if I sunk a float or something else. The bike ran so good before it sat for a few years and it was running with empty air boxes.I am going back to square one, I will get another compression test, I know I'm getting spark...and apparently loads of fuel! Valve adjustment also. For today I think I am walking away. I was so sure today was going to be THE day. Thanks again for your input. I'm sure I will be asking more ....maybe I will start taking the motor out of the other one now.... ( as an aside to all of this, while trying to start it I mistakenly put the gas tank lever to PR setting which started the whole "gas dumping issue" when I craked it after doing that.)
 
I am figuring that discretion is the better part of valor. I had thought that because this bike had run so good a few years ago I needn't open up the top end before re-installing the motor. I fear I was wrong. The sound advice I have been offered here has made me decide to pull the head off and probably, at least, do a re-ring and valve lap. My question is," is it easy to do this with the motor in frame?".I work at home alone and my physical issues proved that the motor is a load for me to handle. As I have found the Haynes offers just enough info to get me in trouble so I ask for advice.
 
I am figuring that discretion is the better part of valor. I had thought that because this bike had run so good a few years ago I needn't open up the top end before re-installing the motor. I fear I was wrong. The sound advice I have been offered here has made me decide to pull the head off and probably, at least, do a re-ring and valve lap. My question is," is it easy to do this with the motor in frame?".I work at home alone and my physical issues proved that the motor is a load for me to handle. As I have found the Haynes offers just enough info to get me in trouble so I ask for advice.

If it was me I would pull the motor and do it. Not even sure there is enough room to pull the head off in the frame.
 
Could probably get the head off but not the cylinders to change the rings.

This is what I am thinking also. I do know the top motor mount needs to come off to get to the bolts also......I purchased a SS bolt kit for my motor and it came with head bolts. I decided to leave the stock ones on as I didn't want to re seal the head and don't want to take any chances with a leak.......the covers well new gaskets so.......

Post up what you end up doing. I am tearing into a motor soon to. Not sure if a total rebuild or ?
 
I will start the breakdown today on 2 seperate motors.I will look at each and make a plan for each. My other frame is headed to the welder today and hopefully I will have 2 solid power plants when I'm done. Update: I decided to start on things around 9:30am and I have the first motor(estart only) on the ground. I will start on the second one after I run some errands. HOT day for working outside already (11:30). After I get the second one out we will open them up and have a look see.
 
Last edited:
I have heard of bikes not starting due to ignition coils being swapped and installed in reverse. In my research I find that the 2 coils on my 1980 G have identical part numbers. Am I correct to assume that the side that they are connected should not make a difference?
 
The coils are the same but the left needs to fire when the left cylinder is completing its compression cycle and vice versa for the right.
If they're swapped and the left cylinder fires when it's on an intake stroke nothing happens.

Easy to fix though.
 
The coils are the same but the left needs to fire when the left cylinder is completing its compression cycle and vice versa for the right.
If they're swapped and the left cylinder fires when it's on an intake stroke nothing happens.

Easy to fix though.
I could verify that how? If I swapped plug wires would that tell me?
 
Don't move anything.
There's a connector from the harness to the left coil and another one to the right coil.
Two wires each.
Unplug them and plug each into the other coil.
If that was the problem it'll be immediately apparent.
 
Back
Top